Openvpn部署文档
使用脚本安装openvpn
1
2
3
4
5
6
7
8
9
10
11
12
13
14
15
16
17
18
19
20
21
22
23
24
25
26
27
28
| $ curl https://www.putianhui.cn/package/script/install_openvpn.sh
Welcome to this OpenVPN road warrior installer!
This server is behind NAT. What is the public IPv4 address or hostname?
Public IPv4 address / hostname [47.97.49.22]:
Which protocol should OpenVPN use?
1) UDP (recommended)
2) TCP
Protocol [1]: 2
What port should OpenVPN listen to?
Port [1194]: 11940
Select a DNS server for the clients:
1) Current system resolvers
2) Google
3) 1.1.1.1
4) OpenDNS
5) Quad9
6) AdGuard
DNS server [1]: 1
Enter a name for the first client:
Name [client]: test
OpenVPN installation is ready to begin.
Press any key to continue...
|
修改openvpn服务端配置文件
1
2
3
4
5
6
7
8
9
10
11
12
13
14
15
16
17
18
19
20
21
22
23
24
25
26
27
28
| $ vim /etc/openvpn/server/server.conf
management 0.0.0.0 5555
port 11940
proto tcp
dev tun
ca ca.crt
cert server.crt
key server.key
dh dh.pem
auth SHA512
tls-crypt tc.key
topology subnet
server 10.8.0.0 255.255.255.0
ifconfig-pool-persist ipp.txt
client-to-client
push "dhcp-option DNS 192.168.66.253"
;push "dhcp-option DOMAIN putianhui-local.com"
push "route 192.168.66.0 255.255.255.0"
keepalive 10 120
cipher AES-256-CBC
user nobody
group nobody
persist-key
persist-tun
status openvpn-status.log
log-append openvpn.log
verb 3
crl-verify crl.pem
|
重启openvpn服务器
1
| systemctl restart openvpn-iptables.service && systemctl restart openvpn-server@server.service
|
阿里云安全组开放11940端口,将生成的配置文件导入到客户端即可连接成功。
默认配置的server客户端连接成功之后,访问内网的流量是经过server端,将源地址nat转换成server的内网ip访问到其他服务器,也就是说vpn客户端访问其他服务,其他服务端收到的访问请求地址的vpn-server的内网ip地址。
这里看下iptables规则
1
2
3
4
5
6
7
8
9
10
11
12
13
| [root@iZbp1du1pgpecnv8rba4k0Z ~]
Chain PREROUTING (policy ACCEPT)
target prot opt source destination
Chain INPUT (policy ACCEPT)
target prot opt source destination
Chain OUTPUT (policy ACCEPT)
target prot opt source destination
Chain POSTROUTING (policy ACCEPT)
target prot opt source destination
SNAT all -- 10.8.0.0/24 !10.8.0.0/24 to:192.168.66.71
|
有的时候我需要直接让vpn客户端的本地ip访问,这个时候我们就需要配置一些规则。
服务端iptables配置取消地址伪装
1
2
| $ iptables -t nat -D POSTROUTING -s 10.8.0.0/24 ! -d 10.8.0.0/24 -j SNAT --to-source 192.168.66.71
$ iptables-save
|
开启server端的路由转发功能
1
2
3
4
| $ vim /etc/sysctl.conf
net.ipv4.ip_forward = 1
$ sysctl -p
|
添加阿里云vpc中到openvpn客户端网段的路由条目
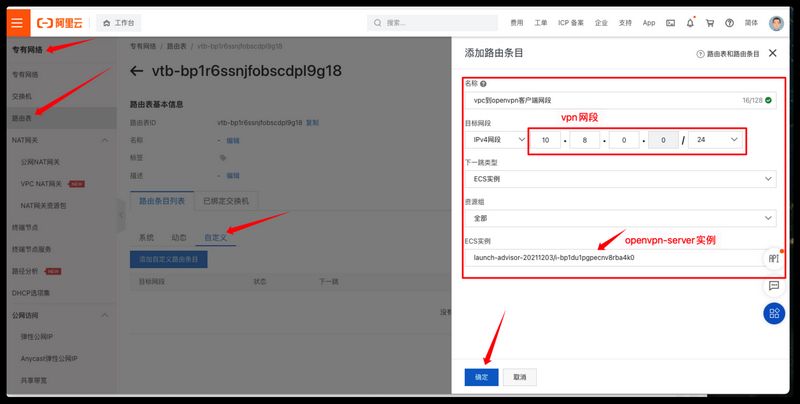
至此断开重连openvpn客户端,再次访问内网服务,此时内网服务获取到的ip就是vpn客户端10.8.0.0./24的地址了。
ubuntu客户端安装
添加ubuntu的阿里云镜像源
1
2
3
4
5
6
7
8
9
10
11
12
13
14
15
16
17
18
19
20
21
22
23
24
| $ mv /etc/apt/sources.list /etc/apt/sources.list.bak
$ cat > /etc/apt/sources.list<<EOF
deb http://mirrors.cloud.aliyuncs.com/ubuntu/ bionic main restricted
deb-src http://mirrors.cloud.aliyuncs.com/ubuntu/ bionic main restricted
deb http://mirrors.cloud.aliyuncs.com/ubuntu/ bionic-updates main restricted
deb-src http://mirrors.cloud.aliyuncs.com/ubuntu/ bionic-updates main restricted
deb http://mirrors.cloud.aliyuncs.com/ubuntu/ bionic universe
deb-src http://mirrors.cloud.aliyuncs.com/ubuntu/ bionic universe
deb http://mirrors.cloud.aliyuncs.com/ubuntu/ bionic-updates universe
deb-src http://mirrors.cloud.aliyuncs.com/ubuntu/ bionic-updates universe
deb http://mirrors.cloud.aliyuncs.com/ubuntu/ bionic multiverse
deb-src http://mirrors.cloud.aliyuncs.com/ubuntu/ bionic multiverse
deb http://mirrors.cloud.aliyuncs.com/ubuntu/ bionic-updates multiverse
deb-src http://mirrors.cloud.aliyuncs.com/ubuntu/ bionic-updates multiverse
deb http://mirrors.cloud.aliyuncs.com/ubuntu/ bionic-backports main restricted universe multiverse
deb-src http://mirrors.cloud.aliyuncs.com/ubuntu/ bionic-backports main restricted universe multiverse
deb http://mirrors.cloud.aliyuncs.com/ubuntu bionic-security main restricted
deb-src http://mirrors.cloud.aliyuncs.com/ubuntu bionic-security main restricted
deb http://mirrors.cloud.aliyuncs.com/ubuntu bionic-security universe
deb-src http://mirrors.cloud.aliyuncs.com/ubuntu bionic-security universe
EOF
$ apt-get update
|
安装openvpn依赖以及openvn服务相关工具
1
| $ apt-get install libpkcs11-helper1 openvpn openvpn-systemd-resolved -y
|
将运维提供的xxx.ovpn文件移动至/etc/openvpn/client/客户端目录下
1
| $ mv test.ovpn /etc/openvpn/client/
|
修改xxx.ovpn配置文件添加四行内容(客户端配置文件不添加这四行内容的话vpn可以连接,也可以直接通过ip访问,但是内部dns域名是无法访问的)。
1
2
3
4
5
| $ vim /etc/openvpn/client/test.ovpn
script-security 2
up /etc/openvpn/update-systemd-resolved
down /etc/openvpn/update-systemd-resolved
down-pre
|
启动openvpn客户端并测试连接是否正常
1
2
3
4
5
6
7
8
9
10
11
12
|
$ openvpn --daemon --cd /etc/openvpn/client --config test.ovpn --log-append /etc/openvpn/client/client.log
$ ping 192.168.99.1
PING 192.168.99.1 (192.168.99.1) 56(84) bytes of data.
64 bytes from 192.168.99.1: icmp_seq=1 ttl=254 time=7.89 ms
$ ping git.putianhui-local.com
PING git.putianhui-local.com (192.168.99.241) 56(84) bytes of data.
64 bytes from 192.168.99.241 (192.168.99.241): icmp_seq=1 ttl=62 time=7.92 ms
|
查看启动日志
1
2
3
4
5
6
7
8
9
10
11
| $ tail -f /etc/openvpn/client/client.log
Thu Apr 21 13:46:13 2022 /etc/openvpn/update-systemd-resolved tun0 1500 1554 10.8.0.36 255.255.255.0 init
<14>Apr 21 13:46:13 update-systemd-resolved: Link 'tun0' coming up
<14>Apr 21 13:46:13 update-systemd-resolved: Adding IPv4 DNS Server 192.168.99.253
<14>Apr 21 13:46:13 update-systemd-resolved: Adding IPv4 DNS Server 192.168.99.254
<14>Apr 21 13:46:13 update-systemd-resolved: Setting DNS Domain putianhui-local.com
<14>Apr 21 13:46:13 update-systemd-resolved: SetLinkDNS(3 2 2 4 192 168 99 253 2 4 192 168 99 254)
<14>Apr 21 13:46:13 update-systemd-resolved: SetLinkDomains(3 1 putianhui-local.com false)
Thu Apr 21 13:46:13 2022 /sbin/ip route add 192.168.99.0/24 via 10.8.0.1
Thu Apr 21 13:46:13 2022 Initialization Sequence Completed
|
如果关闭vpn客户端
1
| $ ps aux |grep openvpn|grep -v grep | awk '{print $2}'|xargs kill -9
|
Centos客户端安装
参考文档:https://community.openvpn.net/openvpn/wiki/OpenVPN3Linux
安装openvpn3客户端
1
2
3
| yum install yum-plugin-copr
yum copr enable dsommers/openvpn3
yum install openvpn3-client
|
根据配置文件启动客户端
1
2
3
4
| $ openvpn3 session-start --config /etc/openvpn/client/test.ovpn
Using configuration profile from file: /etc/openvpn/client/test.ovpn
Session path: /net/openvpn/v3/sessions/56699b26s2464s4dfes9973sc3454085f471
Connected
|
查看vpn启动状态
1
2
3
4
5
6
| $ openvpn3 session-stats -c /etc/openvpn/client/test.ovpn
Connection statistics:
BYTES_IN....................3414
BYTES_OUT...................3463
PACKETS_IN....................10
PACKETS_OUT...................11
|
验证vpn内网连通性
1
2
3
4
5
6
7
8
9
|
$ ping 192.168.99.1
PING 192.168.99.1 (192.168.99.1) 56(84) bytes of data.
64 bytes from 192.168.99.1: icmp_seq=1 ttl=254 time=8.72 ms
$ ping git.putianhui-local.com
PING git.putianhui-local.com (192.168.99.241) 56(84) bytes of data.
64 bytes from 192.168.99.241 (192.168.99.241): icmp_seq=1 ttl=62 time=5.85 ms
|
断开连接
1
| $ openvpn3 session-manage -c /etc/openvpn/client/test.ovpn --disconnect
|
openvpn的监控
修改openvpn的server.conf添加状态日志
1
2
| $ vim /etc/openvpn/server/server.conf
status openvpn-status.log
|
查看生成的状态日志
1
2
3
4
5
6
7
8
9
|
$ cat /etc/openvpn/server/openvpn-status.log
TITLE,OpenVPN 2.4.11 x86_64-redhat-linux-gnu [Fedora EPEL patched] [SSL (OpenSSL)] [LZO] [LZ4] [EPOLL] [PKCS11] [MH/PKTINFO] [AEAD] built on Apr 21 2021
TIME,Thu Apr 21 14:35:13 2022,1650522913
HEADER,CLIENT_LIST,Common Name,Real Address,Virtual Address,Virtual IPv6 Address,Bytes Received,Bytes Sent,Connected Since,Connected Since (time_t),Username,Client ID,Peer ID
CLIENT_LIST,test,220.200.125.191:2365,10.8.0.8,,11232596,377593831,Thu Apr 21 11:16:59 2022,1650511019,UNDEF,8353,0
HEADER,ROUTING_TABLE,Virtual Address,Common Name,Real Address,Last Ref,Last Ref (time_t)
ROUTING_TABLE,10.8.0.25,test,183.193.50.245:1950,Thu Apr 21 12:28:51 2022,1650515331
END
|
通过docker安装openv-exporter
1
2
3
4
5
|
$ curl https://www.putianhui.cn/package/script/install_docker.sh | bash
$ docker run -d --name openvpn_exporter -p 9176:9176 -v /etc/openvpn/server/openvpn-status.log:/etc/openvpn_exporter/server.status kumina/openvpn-exporter -openvpn.status_paths /etc/openvpn_exporter/server.status
|
修改promethues.yml配置文件,添加openvpn的监控job
1
2
3
4
5
6
7
8
| $ vim prometheus.yml
- job_name: 'openvpn-metrics'
scrape_interval: 20s
static_configs:
- targets: ['192.168.99.3:9176']
$ curl -XPOST http://192.168.99.125:9090/-/reload
|
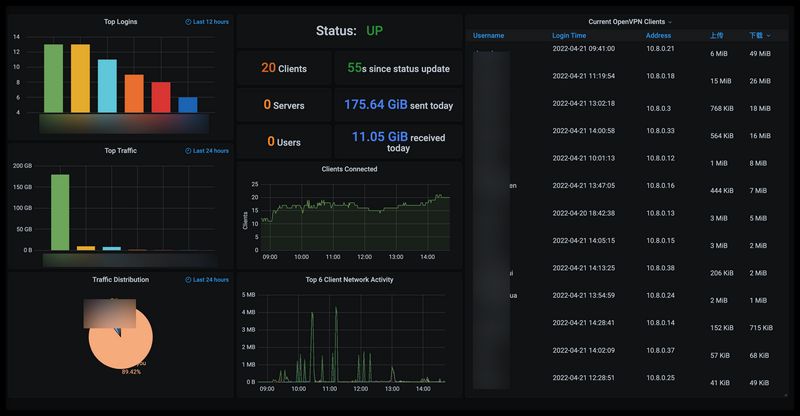
grafana导入仪表盘10562或者下载我下面提供的json文件导入,选择数据源后即可出图。
1
2
|
https://www.putianhui.cn/package/script/grafana/grafana-openvpn.json
|
结果展示
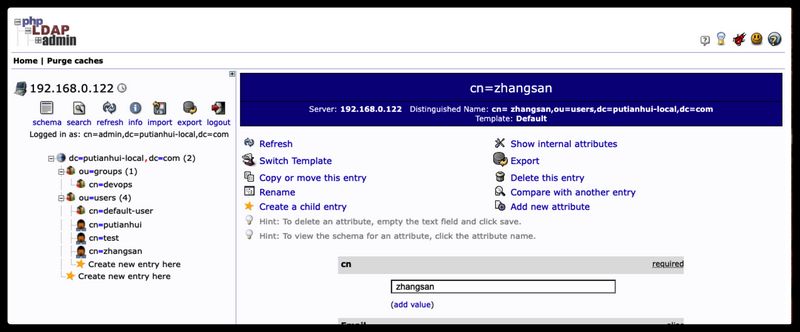
openvpn接入ldap认证
接入ladp后通过ldap的用户名和密码来认证
ldap用户拓扑图
openvpn-server安装ldap认证插件
1
| yum -y install openvpn-auth-ldap
|
openvpn的ldap配置文件
1
2
3
4
5
6
7
8
9
10
11
12
13
14
| $ cat auth/ldap.conf
<LDAP>
URL "ldap://192.168.0.122:389"
BindDN "cn=admin,dc=putianhui-local,dc=com"
Password "123456"
Timeout 15
TLSEnable no
FollowReferrals no
</LDAP>
<Authorization>
BaseDN "ou=users,dc=putianhui-local,dc=com"
SearchFilter "(&(uid=%u))"
RequireGroup false
</Authorization>
|
server配置文件
1
2
3
4
5
6
7
8
9
10
11
12
13
14
15
16
17
18
19
20
21
22
23
24
25
26
27
28
29
30
31
32
33
34
35
|
management 0.0.0.0 5555
port 11940
proto tcp
dev tun
ca ca.crt
cert server.crt
key server.key
dh dh.pem
auth SHA512
tls-crypt tc.key
topology subnet
server 10.8.0.0 255.255.255.0
ifconfig-pool-persist ipp.txt
client-to-client
push "dhcp-option DNS 114.114.114.114"
;push "dhcp-option DOMAIN putianhui-local.com"
push "route 192.168.0.0 255.255.255.0"
keepalive 10 120
cipher AES-256-CBC
user nobody
group nobody
persist-key
persist-tun
status openvpn-status.log
log-append openvpn.log
verb 3
crl-verify crl.pem
script-security 3
plugin /usr/lib64/openvpn/plugin/lib/openvpn-auth-ldap.so "/etc/openvpn/auth/ldap.conf %u"
client-cert-not-required
username-as-common-name
|
客户端配置文件
1
2
3
4
5
6
7
8
9
10
11
12
13
14
15
16
17
18
19
20
21
22
23
24
25
26
27
28
29
30
31
32
33
34
35
36
37
38
39
40
41
42
43
44
45
46
47
48
49
50
51
52
53
54
55
56
57
| $ cat ~/Desktop/ldap-test.ovpn
client
dev tun
proto tcp
remote 114.55.232.220 11940
resolv-retry infinite
nobind
persist-key
persist-tun
remote-cert-tls server
auth SHA512
cipher AES-256-CBC
verb 3
ns-cert-type server
auth-user-pass
<ca>
-----BEGIN CERTIFICATE-----
MIIDKzCCAhOgAwIBAgIJAI+EVw1sY5frMA0GCSqGSIb3DQEBCwUAMBMxETAPBgNV
BAMMCENoYW5nZU1lMB4XDTIyMDIxNTA2MDE1MVoXDTMyMDIxMzA2MDE1MVowEzER
MA8GA1UEAwwIQ2hhbmdlTWUwggEiMA0GCSqGSIb3DQEBAQUAA4IBDwAwggEKAoIB
AQDt4NIApDESkCP94/0VthyD3R3a1WaVFGSQ/IBmZEBgYj4OVZssKFxnmKXj2CSU
i6y4rh/V0vaRCnkhm4aSrkXucunO4Qz8ulZtLuFw3vkSRIt583/iWVLsw4YkFJc0
qYOH3oDv49cT8athxygo/qbHtmKi1wY2E5mGK22iaCg+VEDlVtTrCz6GdOnEu3oe
eI7UIftlu9G3eVebEOjnAIKIlWePZA5O7U3UrZtckwDUKn4FVO7MiYCy92/Dw/xb
DI8/APXAnLisXcVJNaUw45t8oDWPyk0dvQmDQxV+AVZkwIw0d5iWmNW8u3JBQoX8
592/GnS5IvQMtJZJdfsrcTPPAgMBAAGjgYEwfzAdBgNVHQ4EFgQUGB5lwMM/a+G0
gOXwiCWjYpgD9ZYwQwYDVR0jBDwwOoAUGB5lwMM/a+G0gOXwiCWjYpgD9ZahF6QV
MBMxETAPBgNVBAMMCENoYW5nZU1lggkAj4RXDWxjl+swDAYDVR0TBAUwAwEB/zAL
BgNVHQ8EBAMCAQYwDQYJKoZIhvcNAQELBQADggEBAGPHaJezUkpscTbNjTdG01Cf
cx6M8gdXOoVyJmjFHHlhRX4yXzzqEqyAnHVPEEN5atw3tlqC6+6zptwbmNBEEAjF
72CCH3jQVV3ZmJeJ8wir/llyX+T6lSfYPIU+m/egTOoPmHZG5NzUkjWZ4hn15ZjJ
Eu3N0TBi8C2Ees/LbomHXTPJv0kKoctt0iXb2bf6y37op1bkpQl+Au4cyFHXkPL4
d1uOc3ZHFWmF9vcz1uhoPEvcjpMl2IwUP/ZYmSbSoWpJHRcNVG6JeeuIkc6T8H2q
ickIdvsnTTzh0UkKIPWRG/AUjWDNMWD2OgMeGz1QQ9vFIBDw1MAp2QqcwMKK9H0=
-----END CERTIFICATE-----
</ca>
<tls-crypt>
-----BEGIN OpenVPN Static key V1-----
a584b2017c73e530bcc169acfa1c2893
7b55897a597575aa64eab6dd997ce816
01fbdd9cf4d9fabbd5bd8a693a778d3d
a56d44bb1b3f02ce4109a32fe68cdaad
649f5b2c5f86fc9262e08b684eefd0eb
70f725d0f7ca6ff54e2d3f318caf7e50
b8005974155f13437e70a81acfb30b93
431880fb902ded3a7a5fc70b9274e035
30c4a0f5da4dd9dc1611c9a14ac0c7d7
ba150d436dab49ae710a9c4a5a9f0e59
8fb4e88972bb08a222e75a88c7ae379e
edd7b02e49e94153e7f0156112a1cf4a
8db01083552fd2daad84c3d4e55f1208
9dde15d69b0665ee48f50c16c3ecb0c3
fd895ed8b7dc37f08cc7e5236716be7b
64839a965014f22111a6efb7289bc771
-----END OpenVPN Static key V1-----
</tls-crypt>
|