MVVM 模型
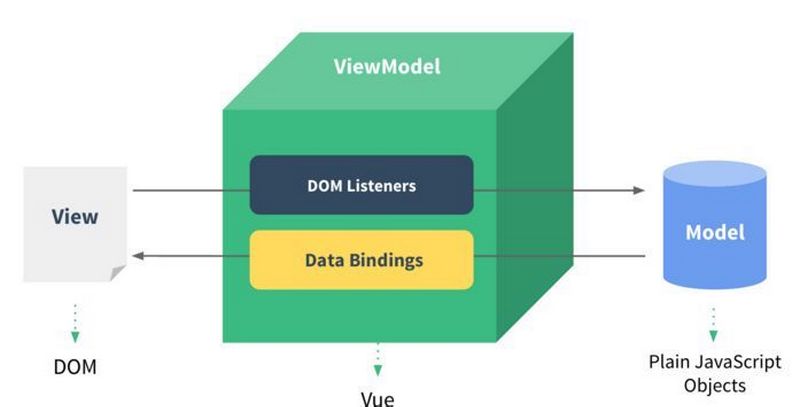
MVVM模型
- M:模型
Model,data中的数据
- V:视图
View,模板代码
- VM:视图模型
ViewModel,Vue实例
观察发现
data中所有的属性,最后都出现在了vm身上vm身上所有的属性 及Vue原型身上所有的属性,在 Vue模板中都可以直接使用
1
2
3
4
5
6
7
8
9
10
11
12
13
14
15
16
17
18
19
20
21
22
23
24
25
26
27
28
| <!DOCTYPE html>
<html lang="en">
<head>
<meta charset="UTF-8" />
<meta http-equiv="X-UA-Compatible" content="IE=edge" />
<meta name="viewport" content="width=device-width, initial-scale=1.0" />
<title>mvvm</title>
<script src="../js/vue.js"></script>
</head>
<body>
<div id="root">
<h2>姓名:{{ name }}</h2>
<h2>地址:{{ addr }}</h2>
<h2>测试:{{ $options }}</h2>
</div>
<script>
Vue.config.productionTip = false;
new Vue({
el: "#root",
data: {
name: "张三",
addr: "上海",
},
});
</script>
</body>
</html>
|

Vue 中的数据代理
Object.defineproperty方法
1
2
3
4
5
6
7
8
9
10
11
12
13
14
15
16
17
18
19
20
21
22
23
24
25
26
27
| let number = 18
let person = {
name: '张三',
sex: '男',
}
Object.defineProperty(person, 'age', {
get() {
console.log('有人读取age属性了')
return number
},
set(value) {
console.log('有人修改了age属性,且值是', value)
number = value
}
})
console.log(person)
|
数据代理:通过一个对象代理对另一个对象中属性的操作(读/写)
1
2
3
4
5
6
7
8
9
10
11
| let obj = { x: 100 }
let obj2 = { y: 200 }
Object.defineProperty(obj2, 'x', {
get() {
return obj.x
},
set(value) {
obj.x = value
}
})
|
Vue中的数据代理通过vm对象来代理data对象中属性的操作(读/写)
Vue中数据代理的好处:更加方便的操作data中的数据
基本原理
a、通过object.defineProperty()把data对象中所有属性添加到vm上
b、为每一个添加到vm上的属性,都指定一个 getter setter
c、在getter setter内部去操作(读/写)data中对应的属
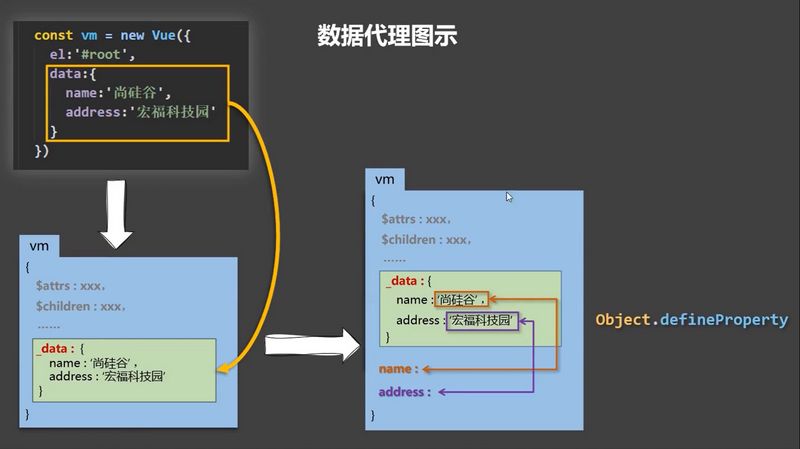
Vue将data中的数据拷贝了一份到_data属性中,又将_data里面的属性提到Vue实例中(如name),通过defineProperty实现数据代理,这样通过geter/setter操作 name,进而操作_data中的 name。而_data又对data进行数据劫持,实现响应式
1
2
3
4
5
6
7
8
9
10
11
12
13
14
15
16
17
18
19
20
21
22
23
24
25
26
27
| <!DOCTYPE html>
<html>
<head>
<meta charset="UTF-8" />
<title>Vue中的数据代理</title>
<script type="text/javascript" src="../js/vue.js"></script>
</head>
<body>
<div id="root">
<h2>学校名称:{{ name }}</h2>
<h2>学校地址:{{ address }}</h2>
</div>
<script type="text/javascript">
Vue.config.productionTip = false;
const vm = new Vue({
el: "#root",
data: {
name: "张三",
address: "上海",
},
});
</script>
</body>
</html>
|
事件处理
事件的基本用法
- 使用
v-on:xxx或@xxx绑定事件,其中 xxx 是事件名
- 事件的回调需要配置在
methods对象中,最终会在vm上
methods中配置的函数,不要用箭头函数,否则 this 就不是vm了methods中配置的函数,都是被 Vue所管理的函数,this 的指向是vm或组件实例对象@click="demo"和@click="demo($event)"效果一致,但后者可以传参
1
2
3
4
5
6
7
8
9
10
11
12
13
14
15
16
17
18
19
20
21
22
23
24
25
26
27
28
29
30
31
32
33
34
35
36
37
38
39
40
41
| <!DOCTYPE html>
<html>
<head>
<meta charset="UTF-8" />
<title>事件的基本使用</title>
<script type="text/javascript" src="../js/vue.js"></script>
</head>
<body>
<div id="root">
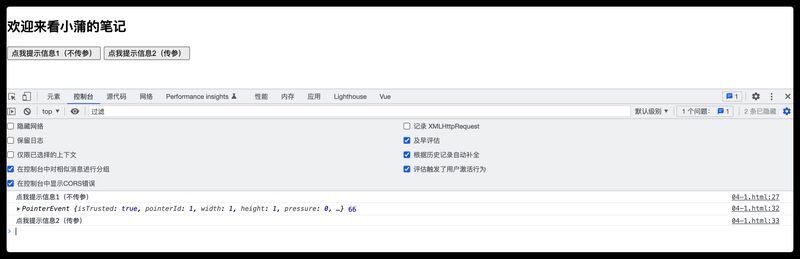
<h2>欢迎来看{{name}}的笔记</h2>
<button @click="showInfo1">点我提示信息1(不传参)</button>
<button @click="showInfo2($event,66)">点我提示信息2(传参)</button>
</div>
<script type="text/javascript">
Vue.config.productionTip = false;
const vm = new Vue({
el: "#root",
data: {
name: "小蒲",
},
methods: {
showInfo1(event) {
console.log(event.target.innerText);
alert("同学你好!");
},
showInfo2(event, number) {
console.log(event, number);
console.log(event.target.innerText);
alert("同学你好!!");
},
},
});
</script>
</body>
</html>
|
事件修饰符
Vue中的事件修饰符
prevent 阻止默认事件(常用)stop 阻止事件冒泡(常用)once 事件只触发一次(常用)capture 使用事件的捕获模式self 只有event.target是当前操作的元素时才触发事件passive 事件的默认行为立即执行,无需等待事件回调执行完毕
修饰符可以连续写,比如可以这么用:@click.prevent.stop="showInfo"
1
2
3
4
5
6
7
8
9
10
11
12
13
14
15
16
17
18
19
20
21
22
23
24
25
26
27
28
29
30
31
32
33
34
35
36
37
38
39
40
41
42
43
44
45
46
47
48
49
50
51
52
53
54
55
56
57
58
59
60
61
62
63
64
65
66
67
68
69
70
71
72
73
74
75
76
77
78
79
80
81
82
83
84
85
86
87
88
89
90
91
92
93
94
95
96
97
98
99
100
101
| <!DOCTYPE html>
<html>
<head>
<meta charset="UTF-8" />
<title>事件修饰符</title>
<script type="text/javascript" src="../js/vue.js"></script>
<style>
* {
margin-top: 20px;
}
.demo1 {
height: 50px;
background-color: skyblue;
}
.box1 {
padding: 5px;
background-color: skyblue;
}
.box2 {
padding: 5px;
background-color: white;
}
.list {
width: 200px;
height: 200px;
background-color: skyblue;
overflow: auto;
}
li {
height: 100px;
}
</style>
</head>
<body>
<div id="root">
<h2>欢迎来到{{ name }}学习</h2>
<a href="http://www.atguigu.com" @click.prevent="showInfo"
>点我提示信息</a
>
<div class="demo1" @click="showInfo">
<button @click.stop="showInfo">点我提示信息</button>
</div>
<button @click.once="showInfo">点我提示信息</button>
<div class="box1" @click.capture="showMsg(1)">
div1
<div class="box2" @click="showMsg(2)">div2</div>
</div>
<div class="demo1" @click.self="showInfo">
<button @click="showInfo">点我提示信息</button>
</div>
<ul @wheel.passive="demo" class="list">
<li>1</li>
<li>2</li>
<li>3</li>
<li>4</li>
</ul>
</div>
<script type="text/javascript">
Vue.config.productionTip = false;
new Vue({
el: "#root",
data: {
name: "小蒲笔记",
},
methods: {
showInfo(e) {
alert("同学你好!");
},
showMsg(msg) {
console.log(msg);
},
demo() {
for (let i = 0; i < 100000; i++) {
console.log("#");
}
console.log("累坏了");
},
},
});
</script>
</body>
</html>
|
键盘事件
键盘上的每个按键都有自己的名称和编码,例如:Enter(13)。而Vue还对一些常用按键起了别名方便使用
1、Vue中常用的按键别名
- 回车
enter
- 删除
delete捕获“删除”和“退格”键
- 退出
esc
- 空格
space
- 换行
tab特殊,必须配合keydown去使用
- 上
up
- 下
down
- 左
left
- 右
right
2、Vue未提供别名的按键,可以使用按键原始的key值去绑定,但注意要转为kebab-case(多单词小写短横线写法)
3、系统修饰键(用法特殊)ctrl alt shift meta(meta就是win键)
- 配合
keyup使用:按下修饰键的同时,再按下其他键,随后释放其他键,事件才被触发指定 ctr+y 使用 @keyup.ctr.y
- 配合
keydown使用:正常触发事件
4、也可以使用keyCode去指定具体的按键(不推荐)
5、Vue.config.keyCodes.自定义键名 = 键码,可以去定制按键别名
1
2
3
4
5
6
7
8
9
10
11
12
13
14
15
16
17
18
19
20
21
22
23
24
25
26
27
28
29
30
31
32
33
34
35
36
37
38
| <!DOCTYPE html>
<html>
<head>
<meta charset="UTF-8" />
<title>键盘事件</title>
<script type="text/javascript" src="../js/vue.js"></script>
</head>
<body>
<div id="root">
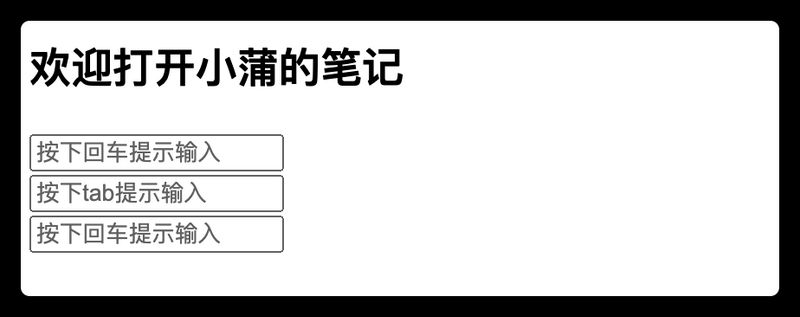
<h2>欢迎打开{{name}}的笔记</h2>
<input type="text" placeholder="按下回车提示输入" @keyup.enter="showInfo" /><br />
<input type="text" placeholder="按下tab提示输入" @keydown.tab="showInfo" /><br />
<input type="text" placeholder="按下回车提示输入" @keydown.huiche="showInfo" /><br />
</div>
<script type="text/javascript">
Vue.config.productionTip = false;
Vue.config.keyCodes.huiche = 13;
new Vue({
el: "#root",
data: {
name: "小蒲",
},
methods: {
showInfo(e) {
console.log(e.target.value);
},
},
});
</script>
</body>
</html>
|