一。集群规划

1.1 机器分配

节点名称 IP地址 角色与功能 配置 磁盘
hdp01.nnv5.cn 192.168.1.21 ambari-server Master namenode 8H32G 500GB *3
hdp02.nnv5.cn 192.168.1.22 Smaster Slave DateNode 8H32G 500GB *3
hdp03.nnv5.cn 192.168.1.23 Slave DateNode 8H32G 500GB *3
hdp04.nnv5.cn 192.168.1.24 Slave DateNode 8H32G 500GB *3

1.2 软件版本

组件 描述
Linux CentOS Linux release 7.7.1908
Ambari 2.7.3.0
HDP 3.1.0
HDP-GPL 3.1.0
HDP-UTILS 1.1.0.22
Mysql 5.7.23
JDK jdk1.8.0_211
JDBC mysql-connector-java-5.1.42

注意:

  • Ambari Server主机到Ambari Agent主机配置免密登录
  • Ambari Server/Agent主机需要安装JDK(不低于JDK8)
  • 确保主机的hostname -f 满足FQDN格式(在安装集群的第三步Confirm Host需要)
  • 关闭firewalld和iptables防火墙,(如有规则要清空)
  • 确认主机字符集编码为UTF-8(否则Ambari Server 配置数据库可能报错)
  • 开启NTP服务(ntp1.aliyun.com)
  • selinux配置为disbaled
  • 配置描述文件数量及最大文件打开数量65535

二。环境配置

2.1 修改主机名与hosts解析

1
2
3
4
5
6
7
8
9
10
11
12
/]$ vim /etc/hostname
hdp01.nnv5.cn
/]$ vim /etc/sysconfig/network
HOSTNAME=hdp01.nnv5.cn
/]$ hostname hdp01.nnv5.cn

/]$ cat >>/etc/hosts<<EOF
192.168.1.21 hdp01.nnv5.cn hdp01 hdprepo.nnv5.cn
192.168.1.22 hdp02.nnv5.cn hdp02
192.168.1.23 hdp03.nnv5.cn hdp03
192.168.1.24 hdp04.nnv5.cn hdp04
EOF

2.2 关闭防火墙关闭selinux

1
2
3
4
5
6
7
## 关闭防火墙
/]$ systemctl stop firewalld && systemctl disable firewalld

## 关闭selinux
/]$ setenforce 0
/]$ vim /etc/sysconfig/selinux
SELINUX=disabled

2.3 关闭THP

如果不关闭THP,Hadoop的系统cpu使用率很高

1
2
3
4
5
6
7
8
9
10
11
12
13
14
15
## 临时关闭
/]$ echo never > /sys/kernel/mm/transparent_hugepage/enabled
/]$ echo never > /sys/kernel/mm/transparent_hugepage/defrag

## 开机自启动关闭
/]$ cat >> /etc/rc.local << EOF
if test -f /sys/kernel/mm/transparent_hugepage/enabled; then
echo never > /sys/kernel/mm/transparent_hugepage/enabled
fi
if -f /sys/kernel/mm/transparent_hugepage/defrag; then
echo never > /sys/kernel/mm/transparent_hugepage/defrag
fi
EOF

/]$ chmod +x /etc/rc.local

2.4 安装JDK1.8

1
2
3
4
5
6
7
8
9
10
11
12
13
14
15
16
17
/]$ wget https://oss.putianhui.cn/software/jdk-8u211-linux-x64.tar.gz
/]$ tar xzvf jdk-8u211-linux-x64.tar.gz
/]$ mv jdk1.8.0_211 /usr/local
/]$ cat >>/etc/profile <<EOF
# JAVA_HOME
export JAVA_HOME=/usr/local/jdk1.8.0_211
export JRE_HOME=\$JAVA_HOME/jre
export PATH=\$PATH:\$JAVA_HOME/bin
export CLASSPATH=.:\$JAVA_HOME/lib/dt.jar:\$JAVA_HOME/lib/tools.jar
EOF

## 加载环境变量验证java是否安装成功
/]$ source /etc/profile
/]$ java -version
java version "1.8.0_211"
Java(TM) SE Runtime Environment (build 1.8.0_211-b12)
Java HotSpot(TM) 64-Bit Server VM (build 25.211-b12, mixed mode)

2.5 配置时间同步与ssh免密登陆

1
2
3
4
5
6
7
8
9
10
/]$ yum install -y ntpdate ntp
/]$ ntpdate ntp1.aliyun.com
~]$ crontab -e
*/10 * * * * /usr/sbin/ntpdate ntp1.aliyun.com

# hdp01节点操作
/]$ ssh-keygen
/]$ cd /root/.ssh/
## 将公钥复制到其他节点实现免密登陆
.ssh]$ for i in `seq 4`;do ssh-copy-id -i id_rsa.pub hdp0$i.nnv5.cn;done

2.6 配置节点jdbc连接驱动

1
2
3
/]$ mkdir -p /usr/share/java
/]$ cp mysql-connector-java-5.1.42.jar /usr/share/java/mysql-connector-java.jar
/]$ for i in `seq 4`;do scp /usr/share/java/mysql-connector-java.jar hdp0$i.nnv5.cn:/usr/share/java/;done

2.7 调整系统内核参数

1
2
3
4
5
6
7
8
9
10
11
12
13
14
15
16
17
18
19
20
21
22
23
24
25
26
27
28
29
30
31
32
33
34
35
36
37
38
39
40
41
42
43
44
45
/]$ cat > /etc/sysctl.conf << EOF
fs.file-max=65535
vm.swappiness=1
net.ipv4.ip_forward = 1
net.ipv4.conf.default.rp_filter = 1
net.ipv4.conf.default.accept_source_route = 0

net.ipv4.tcp_max_tw_buckets = 6000
net.ipv4.ip_local_port_range = 1024 65000
net.ipv4.tcp_timestamps = 1
net.ipv4.tcp_tw_recycle = 0
net.ipv4.tcp_tw_reuse = 1
net.ipv4.tcp_syncookies = 1

kernel.msgmnb = 65536
kernel.msgmax = 65536
kernel.shmmax = 68719476736
kernel.shmall = 4294967296

net.ipv4.tcp_max_syn_backlog = 262144
net.core.netdev_max_backlog = 262144
net.core.somaxconn = 262144
net.ipv4.tcp_max_orphans = 262144

net.ipv4.tcp_synack_retries = 1
net.ipv4.tcp_syn_retries = 1
net.ipv4.tcp_fin_timeout = 1
net.ipv4.tcp_keepalive_time = 30

net.ipv4.tcp_sack = 1
net.ipv4.tcp_window_scaling = 1
net.ipv4.tcp_rmem = 4096 87380 4194304
net.ipv4.tcp_wmem = 4096 16384 4194304
net.core.wmem_default = 8388608
net.core.rmem_default = 8388608
net.core.rmem_max = 16777216
net.core.wmem_max = 16777216
net.ipv4.tcp_mem = 94500000 915000000 927000000
net.nf_conntrack_max = 6553500
net.netfilter.nf_conntrack_max = 6553500
net.netfilter.nf_conntrack_tcp_timeout_close_wait = 60
net.netfilter.nf_conntrack_tcp_timeout_fin_wait = 120
net.netfilter.nf_conntrack_tcp_timeout_time_wait = 120
net.netfilter.nf_conntrack_tcp_timeout_established = 3600
EOF

2.8 磁盘分区挂载

1
2
3
4
5
6
7
8
9
10
11
12
13
14
15
16
17
18
19
20
21
22
23
24
25
26
27
28
29
30
31
32
33
34
35
36
37
38
39
40
41
## 创建分区挂载目录
]$ mkdir /data # DataNode数据存储目录
]$ mkdir /var/log # 集群服务日志存储目录
]$ mkdir /usr/hdp # HDP集群各组件安装配置目录

## 创建分区
~]$ fdisk /dev/sdb n(新建分区) --> 一路回车 --> w(保存分区信息)
~]$ fdisk /dev/sdc n(新建分区) --> 一路回车 --> w(保存分区信息)
~]$ fdisk /dev/sdd n(新建分区) --> 一路回车 --> w(保存分区信息)

## 查看创建的分区
]$ fdisk -l | grep sd.1
/dev/sdb1 2048 1048575999 524286976 83 Linux
/dev/sda1 * 2048 104857599 52427776 83 Linux
/dev/sdc1 2048 1048575999 524286976 83 Linux
/dev/sdd1 2048 1048575999 524286976 83 Linux

## 格式化分区
~]$ mkfs.xfs /dev/sdb1
~]$ mkfs.xfs /dev/sdc1
~]$ mkfs.xfs /dev/sdd1

## 查看分区blkid添加到开机自动挂载
/]$ blkid|grep -v sda1
/dev/sdb1: UUID="015b64ad-f14f-44ad-b9b1-5c4d3e6fad0e" TYPE="xfs"
/dev/sdc1: UUID="c47b2efc-73af-4459-aaf2-2003f5904cc2" TYPE="xfs"
/dev/sdd1: UUID="9d9eaa23-6174-4638-b8fb-5a860c3db5ab" TYPE="xfs"
/]$ vim /etc/fstab
UUID=015b64ad-f14f-44ad-b9b1-5c4d3e6fad0e /data xfs defaults 0 0
UUID=c47b2efc-73af-4459-aaf2-2003f5904cc2 /usr/hdp xfs defaults 0 0
UUID=9d9eaa23-6174-4638-b8fb-5a860c3db5ab /var/log xfs defaults 0 0

## 重新挂载所有分区
/]$ mount -a

## 查看分区挂载信息
]$ df -hT |grep sd..
/dev/sda1 xfs 50G 2.0G 49G 4% /
/dev/sdb1 xfs 500G 33M 500G 1% /data
/dev/sdc1 xfs 500G 33M 500G 1% /usr/hdp
/dev/sdd1 xfs 500G 41M 500G 1% /var/log

三。安装各组件服务

3.1 安装mysql

HDP集群使用的mysql数据库服务器安装到hdp01.nnv5.cn节点上

3.1.1 安装mysql数据库

mysql安装这里跳过。但mysql配置文件要保证以下配置正确:

1
2
3
4
5
# 在[mysqld]下添加
collation_server=utf8_general_ci
character_set_server=utf8
# 在[client]下添加(如果没有[client],则创建)
default_character-set=utf8

3.1.2 创建服务使用的数据库

  • 创建ambari数据库以及数据库用户名和密码

    1
    2
    3
    4
    5
    6
    mysql> create database ambari character set utf8;
    Query OK, 1 row affected (0.00 sec)
    mysql> GRANT ALL ON ambari.* TO 'ambari'@'%' IDENTIFIED BY 'ambari';
    Query OK, 0 rows affected (0.00 sec)
    mysql> FLUSH PRIVILEGES;
    Query OK, 0 rows affected (0.01 sec)
  • 创建hive数据库以及数据库用户名和密码

    1
    2
    3
    4
    5
    6
    mysql> create database hive character set utf8;
    Query OK, 1 row affected (0.00 sec)
    mysql> GRANT ALL ON hive.* TO 'hive'@'%' IDENTIFIED BY 'hive';
    Query OK, 0 rows affected (0.00 sec)
    mysql> FLUSH PRIVILEGES;
    Query OK, 0 rows affected (0.01 sec)
  • 创建ooize数据库以及数据库用户名和密码

    1
    2
    3
    4
    5
    6
    mysql> create database oozie character set utf8;
    Query OK, 1 row affected (0.00 sec)
    mysql> GRANT ALL ON oozie.* TO 'oozie'@'%' IDENTIFIED BY 'ooize';
    Query OK, 0 rows affected (0.00 sec)
    mysql> FLUSH PRIVILEGES;
    Query OK, 0 rows affected (0.01 sec)

3.2 配置ambari本地yum镜像仓库

在hdp01.nnv5.cn节点安装nginx配置repo镜像仓库。

3.2.1 安装nginx

1
2
3
4
5
6
7
8
9
10
11
12
13
14
15
16
17
18
19
20
21
/]$ wget -O /etc/yum.repos.d/epel.repo http://mirrors.aliyun.com/repo/epel-7.repo
/]$ yum install -y nginx
/]$ vim /etc/nginx/nginx.conf
server {
listen 80;
server_name hdprepo.nnv5.cn;
root /data/wwwroot/;
include /etc/nginx/default.d/*.conf;
index index.html index.htm index.php;
autoindex on;
autoindex_exact_size on;
autoindex_localtime on;
}

/]$ mkdir -p /data/wwwroot/{hdp/HDP-UTILS-1.1.0.22,ambari}
/]$ nginx -t
nginx: the configuration file /etc/nginx/nginx.conf syntax is ok
nginx: configuration file /etc/nginx/nginx.conf test is successful

## 启动nginx并将nginx加入到开机自启动
/]$ systemctl enable nginx && systemctl start nginx

3.2.2 下载HDP官方离线安装包

1
2
3
4
5
6
7
8
9
10
11
12
## 下载安装包
/]$ wget http://public-repo-1.hortonworks.com/ambari/centos7/2.x/updates/2.7.3.0/ambari-2.7.3.0-centos7.tar.gz
/]$ wget http://public-repo-1.hortonworks.com/HDP/centos7/3.x/updates/3.1.0.0/HDP-3.1.0.0-centos7-rpm.tar.gz
/]$ wget http://public-repo-1.hortonworks.com/HDP-UTILS-1.1.0.22/repos/centos7/HDP-UTILS-1.1.0.22-centos7.tar.gz

## 解压安装包到nginx根目录
/]$ tar -zxvf ambari-2.7.3.0-centos7.tar.gz -C /data/wwwroot/ambari
/]$ tar -zxvf HDP-3.1.0.0-centos7-rpm.tar.gz -C /data/wwwroot/hdp/
/]$ tar -zxvf HDP-UTILS-1.1.0.22-centos7.tar.gz -C /data/wwwroot/hdp/HDP-UTILS-1.1.0.22/

## 验证
浏览器中访问http://hdprepo.nnv5.cn/ambari 和 http://hdprepo.nnv5.cn/hdp ,访问正常即ambari文件服务配置正常

3.2.3 生成本地镜像仓库repo文件

1
2
3
4
5
6
7
8
9
10
11
12
13
14
15
16
17
18
19
20
21
22
23
24
25
26
27
28
29
30
31
32
33
34
35
36
37
38
39
40
41
42
43
## 生成ambari本地镜像仓库文件
/]$ cat > /etc/yum.repos.d/ambari.repo << EOF
#VERSION_NUMBER=2.7.3.0-139
[ambari-2.7.3.0]
#json.url = http://public-repo-1.hortonworks.com/HDP/hdp_urlinfo.json
name=ambari Version - ambari-2.7.3.0
#baseurl=http://public-repo-1.hortonworks.com/ambari/centos7/2.x/updates/2.7.3.0
# 将hdprepo.nnv5.cn换成你的本地镜像仓库地址
baseurl=http://hdprepo.nnv5.cn/ambari/ambari/centos7/2.7.3.0-139
gpgcheck=1
# 将hdprepo.nnv5.cn换成你的本地镜像仓库地址
gpgkey=http://hdprepo.nnv5.cn/ambari/ambari/centos7/2.7.3.0-139/RPM-GPG-KEY/RPM-GPG-KEY-Jenkins
enabled=1
priority=1
EOF


## 生成HDP本地镜像仓库文件
/]$ cat > /etc/yum.repos.d/HDP.repo << EOF
#VERSION_NUMBER=3.1.0.0-78
[HDP-3.1.0.0]
name=HDP Version - HDP-3.1.0.0
# 将hdprepo.nnv5.cn换成你的本地镜像仓库地址
baseurl=http://hdprepo.nnv5.cn/hdp/HDP/centos7/3.1.0.0-78
gpgcheck=1
# 将hdprepo.nnv5.cn换成你的本地镜像仓库地址
gpgkey=http://hdprepo.nnv5.cn/hdp/HDP/centos7/3.1.0.0-78/RPM-GPG-KEY/RPM-GPG-KEY-Jenkins
enabled=1
priority=1

[HDP-UTILS-1.1.0.22]
name=HDP-UTILS Version - HDP-UTILS-1.1.0.22
# 将hdprepo.nnv5.cn换成你的本地镜像仓库地址
baseurl=http://hdprepo.nnv5.cn/HDP-UTILS-1.1.0.22/HDP-UTILS/centos7/1.1.0.22/
gpgcheck=1
# 将hdprepo.nnv5.cn换成你的本地镜像仓库地址
gpgkey=http://hdprepo.nnv5.cn/hdp/HDP-UTILS-1.1.0.22/HDP-UTILS/centos7/1.1.0.22/RPM-GPG-KEY/RPM-GPG-KEY-Jenkins
enabled=1
priority=1
EOF

## 分发repo文件到其他节点
/]$ cd /etc/yum.repos.d/ &&for i in `seq 2 4`;do scp ./ambari.repo ./HDP.repo hdp0$i.nnv5.cn:/etc/yum.repos.d/;done

3.3 部署ambari-server

在hdp01.nnv5.cn节点安装ambari-server。

3.3.1 安装ambari-server

1
2
3
4
5
6
7
8
9
10
11
12
13
14
15
16
17
18
19
20
21
22
23
24
25
26
27
28
29
30
31
32
33
34
35
36
37
38
39
40
41
42
43
44
45
46
47
48
49
50
51
52
53
54
55
56
57
58
59
60
61
62
63
# 安装ambari-server
/]$ yum install -y ambari-server

# 设置ambari-server使用mysql连接驱动
/]$ ambari-server setup --jdbc-db=mysql --jdbc-driver=/usr/share/java/mysql-connector-java.jar

# 加载ambari-server的mysql表结构
/]$ mysql -uroot -p
sql> source /var/lib/ambari-server/resources/Ambari-DDL-MySQL-CREATE.sql

# 配置ambari-server
/]$ ambari-server setup
Using python /usr/bin/python
Setup ambari-server
Checking SELinux...
SELinux status is 'disabled'
Customize user account for ambari-server daemon [y/n] (n)? y # 以后台守护进程启动ambari-server
Enter user account for ambari-server daemon (root):root # 启动的用户
Adjusting ambari-server permissions and ownership...
Checking firewall status...
Checking JDK...
Do you want to change Oracle JDK [y/n] (n)? y # 是否更改JDK
[1] Oracle JDK 1.8 + Java Cryptography Extension (JCE) Policy Files 8
[2] Custom JDK
==============================================================================
Enter choice (1): 2 # 使用自定义JDK
WARNING: JDK must be installed on all hosts and JAVA_HOME must be valid on all hosts.
WARNING: JCE Policy files are required for configuring Kerberos security. If you plan to use Kerberos,please make sure JCE Unlimited Strength Jurisdiction Policy Files are valid on all hosts.
Path to JAVA_HOME: /usr/local/jdk1.8.0_211 # JDK目录
Validating JDK on Ambari Server...done.
Checking GPL software agreement...
Completing setup...
Configuring database...
Enter advanced database configuration [y/n] (n)? Y # 是否配置数据库
Configuring database...
==============================================================================
Choose one of the following options:
[1] - PostgreSQL (Embedded)
[2] - Oracle
[3] - MySQL / MariaDB
[4] - PostgreSQL
[5] - Microsoft SQL Server (Tech Preview)
[6] - SQL Anywhere
[7] - BDB
==============================================================================
Enter choice (3): 3 ####如果主机字符集编码未设置正确,可能会启动报错,具体可以查看日志/var/log/ambari-server/ambari-server.log
Hostname (localhost): hdp01.nnv5.cn
Port (3306): # 默认3306端口
Database name (ambari): # ambari-server的数据库名称
Username (ambari): # ambari-server的用户名
Enter Database Password (bigdata): # 数据库的密码
Re-enter password:
Configuring ambari database...
Should ambari use existing default jdbc /usr/share/java/mysql-connector-java.jar [y/n] (y)? y # 是否使用默认的jdbc驱动
Configuring remote database connection properties...
WARNING: Before starting Ambari Server, you must run the following DDL directly from the database shell to create the schema: /var/lib/ambari-server/resources/Ambari-DDL-MySQL-CREATE.sql # 此处需注意,启动ambari之前需要执行此句
Proceed with configuring remote database connection properties [y/n] (y)? y
Extracting system views...
ambari-admin-2.7.3.0.139.jar
....
Ambari repo file contains latest json url http://public-repo-1.hortonworks.com/HDP/hdp_urlinfo.json, updating stacks repoinfos with it...
Adjusting ambari-server permissions and ownership...
Ambari Server 'setup' completed successfully. # 安装成功

3.3.2 启动ambari-server服务

1
2
3
4
5
6
7
8
9
10
11
12
13
14
15
16
17
18
19
20
21
/]$ ambari-server start 
Using python /usr/bin/python
Starting ambari-server
Ambari Server running with administrator privileges.
Organizing resource files at /var/lib/ambari-server/resources...
Ambari database consistency check started...
Server PID at: /var/run/ambari-server/ambari-server.pid
Server out at: /var/log/ambari-server/ambari-server.out
Server log at: /var/log/ambari-server/ambari-server.log
Waiting for server start......................
Server started listening on 8080 # 启动成功,浏览器访问http://ip:8080

DB configs consistency check: no errors and warnings were found.
Ambari Server 'start' completed successfully.


## ambari-server的启动与停止
/]$ ambari-server start
/]$ ambari-server stop
/]$ ambari-server restart
/]$ ambari-server status

3.4 创建一个新集群

如果是2.6版本的ambari在此处可能会注册失败,查看ambari-agent的日志会发现

ERROR 2020-06-10 15:35:49,495 NetUtil.py:97 - SSLError: Failed to connect. Please check openssl library versions.
Refer to: https://bugzilla.redhat.com/show_bug.cgi?id=1022468 for more details.

1
2
3
4
5
6
7
## ambari-2.6节点无法注册解决办法
## 参考文档:https://www.cnblogs.com/zlslch/p/9372185.html
/]$ yum install -y openssl openssl-devel
/]$ vim /etc/ambari-agent/conf/ambari-agent.ini
[security]
force_https_protocol=PROTOCOL_TLSv1_2 ## 新添加
/]$ ambari-agent restart ## 所有节点重启agent

此处提示chronyd服务未启动需要手动安装

1
/]$ yum install -y chrony &&systemctl start chronyd.service&&systemctl enable chronyd.service&&ps aux|grep chronyd

四。集群常用的功能

4.1 部署NameNode高可用

4.1.1 部署NameNode高可用

1
2
3
4
[root@hdp01 hadoop]# sudo su hdfs -l -c 'hdfs dfsadmin -safemode enter'
Safe mode is ON
[root@hdp01 hadoop]# sudo su hdfs -l -c 'hdfs dfsadmin -saveNamespace'
Save namespace successful

1
2
3
4
5
6
7
8
9
10
11
12
13
14
15
16
17
18
19
20
21
22
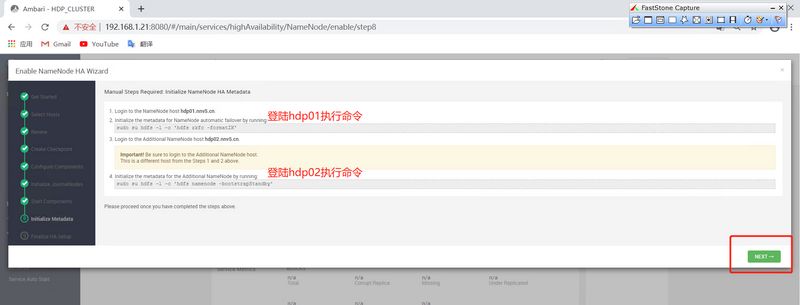
]# sudo su hdfs -l -c 'hdfs namenode -initializeSharedEdits'
20/06/09 15:13:53 INFO namenode.NameNode: STARTUP_MSG:
/************************************************************
STARTUP_MSG: Starting NameNode
STARTUP_MSG: host = hdp01.nnv5.cn/192.168.1.21
STARTUP_MSG: args = [-initializeSharedEdits]
STARTUP_MSG: version = 3.1.1.3.1.0.0-78

20/06/09 15:13:56 INFO client.QuorumJournalManager: Successfully started new epoch 1
20/06/09 15:13:56 INFO namenode.RedundantEditLogInputStream: Fast-forwarding stream '/data/hadoop/hdfs/namenode/current/edits_0000000000000004426-0000000000000004426' to transaction ID 4426
20/06/09 15:13:56 INFO namenode.FSEditLog: Started a new log segment at txid 4426
20/06/09 15:13:56 INFO namenode.FSEditLog: Starting log segment at 4426
20/06/09 15:13:56 INFO namenode.FSEditLog: Ending log segment 4426, 4426
20/06/09 15:13:56 INFO namenode.FSEditLog: logSyncAll toSyncToTxId=4426 lastSyncedTxid=4426 mostRecentTxid=4426
20/06/09 15:13:56 INFO namenode.FSEditLog: Done logSyncAll lastWrittenTxId=4426 lastSyncedTxid=4426 mostRecentTxid=4426
20/06/09 15:13:56 INFO namenode.FSEditLog: Number of transactions: 1 Total time for transactions(ms): 0 Number of transactions batched in Syncs: 0 Number of syncs: 1 SyncTimes(ms): 13
20/06/09 15:13:56 INFO namenode.NameNode: SHUTDOWN_MSG:
/************************************************************
SHUTDOWN_MSG: Shutting down NameNode at hdp01.nnv5.cn/192.168.1.21
************************************************************/

## 初始化成功

1
2
3
4
5
6
7
8
9
10
11
12
13
14
15
16
17
## HDP01节点执行
[root@hdp01 ~]# sudo su hdfs -l -c 'hdfs zkfc -formatZK'
20/06/09 15:19:13 INFO tools.DFSZKFailoverController: STARTUP_MSG:
/************************************************************
STARTUP_MSG: Starting DFSZKFailoverController
STARTUP_MSG: host = hdp01.nnv5.cn/192.168.1.21
STARTUP_MSG: args = [-formatZK]
STARTUP_MSG: version = 3.1.1.3.1.0.0-78

## HDP02节点执行
[root@hdp02 scripts]# sudo su hdfs -l -c 'hdfs namenode -bootstrapStandby'
20/06/09 15:20:36 INFO namenode.NameNode: STARTUP_MSG:
/************************************************************
STARTUP_MSG: Starting NameNode
STARTUP_MSG: host = hdp02.nnv5.cn/192.168.1.22
STARTUP_MSG: args = [-bootstrapStandby]
STARTUP_MSG: version = 3.1.1.3.1.0.0-78

4.1.2 验证NameNodeHA安装成功

4.2 部署ResourceManager高可用

4.2.1 部署ResourceManager高可用

4.2.2 验证ResourceManager安装成功

4.3 开启hive的snappy压缩

1
2
3
4
5
6
7
8
9
10
11
12
13
14
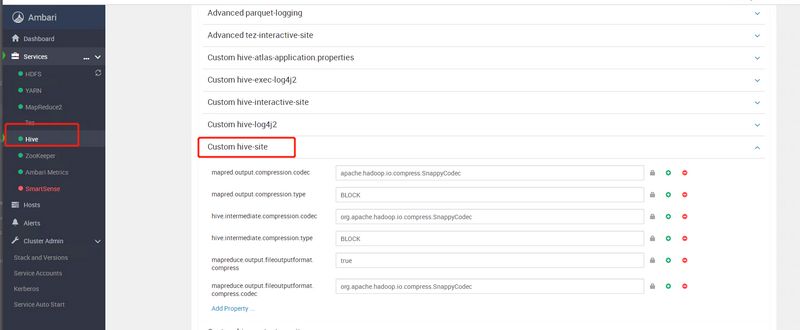
## Map/Reduce 输出压缩
set hive.exec.compress.output=true;
set mapred.output.compression.codec=org.apache.hadoop.io.compress.SnappyCodec;
set mapred.output.compression.type=BLOCK;

## 任务中间压缩
set hive.exec.compress.intermediate=true;
set hive.intermediate.compression.codec=org.apache.hadoop.io.compress.SnappyCodec;
set hive.intermediate.compression.type=BLOCK;

## job输出文件压缩
set mapreduce.output.fileoutputformat.compress=true;
set mapreduce.output.fileoutputformat.compress.codec=org.apache.hadoop.io.compress.SnappyCodec;
set mapreduce.output.fileoutputformat.compress.type=BLOCK;