seata集成Nacos
安装Nacos
1.下载地址
1
| https://github.com/alibaba/nacos/releases
|
2.解压修改配置文件
1
2
3
4
5
6
| vim nacos/conf/application.properties
spring.datasource.platform=mysql
db.num=1
db.url.0=jdbc:mysql://127.0.0.1:3306/nacos?characterEncoding=utf8&connectTimeout=1000&socketTimeout=3000&autoReconnect=true
db.user=nacos
db.password=nacos
|
3.创建nacos数据库并导入数据库结构(数据库官方建议5.6以上)
1
2
| 1.创建nacos数据库
2.导入$Nacos_HOME/conf/nacos-mysql.sql
|
4.启动Nacos
Windows直接双击$Nacos_HOME/bin/startup.cmd
linux不要直接sh startup.sh 加入参数-m standalone或者改startup.sh -m参数,linux脚本默认集群启动,不改参数也不加启动参数会报错.
1
| ]$ $Nacos_HOME/bin/startup.sh -m standalone
|
5.浏览器访问验证 IP:8848/nacos(默认账号密码为nacos/nacos)
安装seata并集成到nacos
1.下载地址
1
| https://github.com/seata/seata/releases
|
2.下载解压二进制包
1
2
3
4
| ~]$ wget https://github.com/seata/seata/releases/download/v1.4.0/seata-server-1.4.0.tar.gz
~]$ tar xzvf seata-server-1.4.0.tar.gz
~]$ mv seata /usr/local/
~]$ chown -R root:root /usr/local/seata/*
|
3.准备seata使用的mysql数据库
注:二进制包里面没有mysql的sql文件,需要手动去github下载
https://github.com/seata/seata/tree/1.4.0/script/server/db
1
2
3
4
5
6
7
8
9
10
11
12
13
14
15
16
17
18
19
20
21
| mysql> create database seata DEFAULT CHARACTER SET utf8 COLLATE utf8_general_ci;
Query OK, 1 row affected, 2 warnings (0.00 sec)
mysql> grant all on seata.* to 'seata'@'%' identified by 'seata';
mysql> flush privileges;
mysql> use seata;
Database changed
mysql> source /root/seata-mysql.sql
Query OK, 0 rows affected, 1 warning (0.02 sec)
Query OK, 0 rows affected, 1 warning (0.02 sec)
Query OK, 0 rows affected, 1 warning (0.01 sec)
mysql> show tables;
+
| Tables_in_seata |
+
| branch_table |
| global_table |
| lock_table |
+
|
4.修改seata配置文件
修改file.conf配置文件
1
2
3
4
5
6
7
8
9
10
11
12
13
14
15
16
17
18
19
20
21
22
23
24
25
26
| ]$ vim /usr/local/seata/conf/file.conf
-----------------------------------------------------------------
store {
mode = "db"
db {
datasource = "druid"
dbType = "mysql"
driverClassName = "com.mysql.jdbc.Driver"
url = "jdbc:mysql://172.23.5.117:3306/seata"
user = "seata"
password = "seata"
minConn = 5
maxConn = 100
globalTable = "global_table"
branchTable = "branch_table"
lockTable = "lock_table"
queryLimit = 100
maxWait = 5000
}
}
|
修改registry.conf配置文件
1
2
3
4
5
6
7
8
9
10
11
12
13
14
15
16
17
18
19
20
21
22
23
24
25
26
27
28
29
30
| ]$ vim /usr/local/seata/conf/registry.conf
registry {
type = "nacos"
loadBalance = "RandomLoadBalance"
loadBalanceVirtualNodes = 10
nacos {
application = "seata-server"
serverAddr = "172.23.5.117:8848"
group = "SEATA_GROUP"
namespace = "public"
cluster = "default"
username = "nacos"
password = "nacos"
}
}
config {
type = "nacos"
nacos {
serverAddr = "172.23.5.117:8848"
namespace = "public"
group = "SEATA_GROUP"
username = "nacos"
password = "nacos"
}
}
|
5.启动seata服务
1
2
3
4
| ]$ mkdir /usr/local/seata/logs -p
]$ nohup /usr/local/seata/bin/seata-server.sh 172.23.1.55 >> /usr/local/seata/logs/seata.log 2>&1 &
]$ ss -tnl | grep 8091
LISTEN 0 128 *:8091 *:*
|
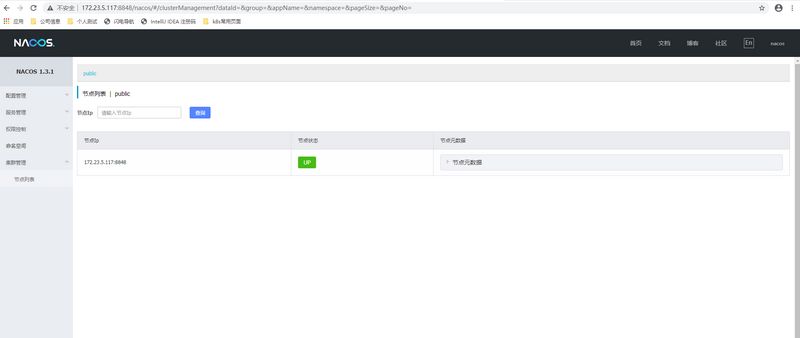
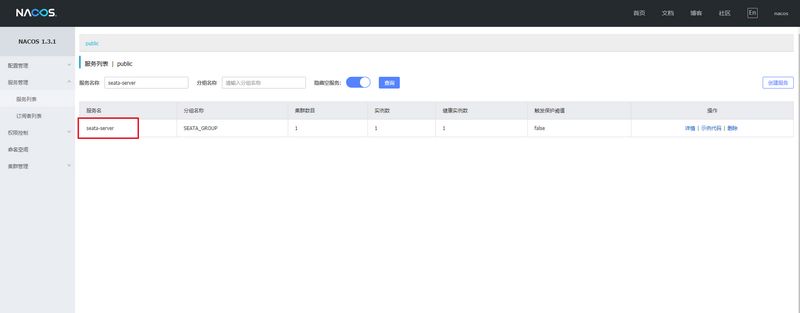
6.浏览器访问nacos控制台查看seata服务是否注册
7.上传seata信息至nacos配置中心
注:二进制包里面没有nacos-config.sh脚本文件,需要手动去github下载对应配置中心的脚本https://github.com/seata/seata/tree/1.4.0/script/config-center
1
2
3
4
5
6
7
8
9
10
11
12
13
14
15
16
17
18
19
20
21
|
]$ vim /usr/local/seata/config.txt
-----------------------------------------------------
service.vgroupMapping.my_test_tx_group=default
store.mode=db
store.db.datasource=druid
store.db.dbType=mysql
store.db.driverClassName=com.mysql.jdbc.Driver
store.db.url=jdbc:mysql://172.23.5.117:3306/seata?useUnicode=true
store.db.user=seata
store.db.password=seata
]$ sh /usr/local/seata/conf/nacos-config.sh -h 172.23.1.55
=========================================================================
Complete initialization parameters, total-count:8 , failure-count:0
=========================================================================
Init nacos config finished, please start seata-server.
|
推送配置信息至配置中心时具体的脚本参数看这里https://github.com/seata/seata/tree/1.4.0/script/config-center
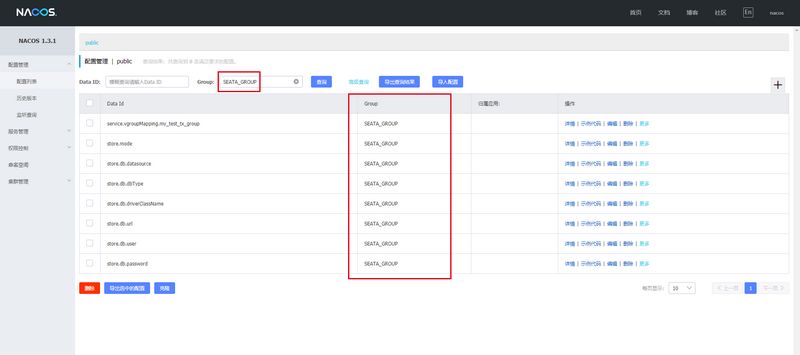
8.登录到nacos查看配置中心信息
daemon功能演示
官方的Daemon示例:https://seata.io/zh-cn/blog/seata-ha-practice.html