七、Volume与PV、PVC、ConfigMap 7.1 Volume存储卷 官网文档:https://kubernetes.io/zh/docs/concepts/storage/volumes/
容器磁盘上的文件的生命周期是短暂的,这就使得在容器中运行重要应用时会出现一些问题。首先,当容器崩溃时,kubelet 会重启它,但是容器中的文件将丢失——容器以干净的状态(镜像最初的状态)重新启动。其次,在Pod 中同时运行多个容器时,这些容器之间通常需要共享文件。Kubernetes 中的 Volume 抽象就很好的解决了这些问题
7.1.1 背景 Kubernetes 中的卷有明确的寿命 —— 与封装它的 Pod 相同。所f以,卷的生命比 Pod 中的所有容器都长,当这
7.1.2 存储卷的类型 1 awsElasticBlockStore 、azureDisk 、azureFile 、cephfs 、cinder 、configMap 、csi 、downwardAPI 、emptyDir 、fc (fibre channel)、flexVolume 、flocker 、gcePersistentDisk 、gitRepo (deprecated)、glusterfs 、hostPath 、iscsi 、local 、nfs 、persistentVolumeClaim 、projected 、portworxVolume 、quobyte 、rbd 、scaleIO 、secret 、storageos 、vsphereVolume
7.1.3 emptyDir存储卷 当 Pod 被分配给节点时,首先创建 emptyDir 卷,并且只要该 Pod 在该节点上运行,该卷就会存在。正如卷的名 字所述,它最初是空的。Pod 中的容器可以读取和写入 emptyDir 卷中的相同文件,尽管该卷可以挂载到每个容 器中的相同或不同路径上。当出于任何原因从节点中删除 Pod 时,emptyDir 中的数据将被永久删除
emptyDir 的用法有:
默认情况下, emptyDir 卷存储在支持该节点所使用的介质上;这里的介质可以是磁盘或 SSD 或网络存储,这取决于您的环境。 但是,您可以将 emptyDir.medium 字段设置为 "Memory",以告诉 Kubernetes 为您安装 tmpfs(基于 RAM 的文件系统)。 虽然 tmpfs 速度非常快,但是要注意它与磁盘不同。 tmpfs 在节点重启时会被清除,并且您所写入的所有文件都会计入容器的内存消耗,受容器内存限制约束
模板示例:
1
2
3
4
5
6
7
8
9
10
11
12
13
14
apiVersion: v1 kind: Pod metadata: name: test-pd spec: containers: - image: k8s.gcr.io/test-webserver name: test-container volumeMounts: - mountPath: /cache name: cache-volume volumes: - name: cache-volume emptyDir: {}
演示小daemon:
创建一个名为empty-data1的emptyDir格式存储卷,将这个名为empty-data1的emptyDir挂载到nginx-01容器网站根目录的voluem/目录下,另外一个busybox容器也将名为empty-data1的emptyDir存储卷挂载到容器的opt目录下,并每间隔2秒将容器的名称以及当前的时间添加到/opt/volume.html文件中,客户端访问svc的clusterIP和对应端口号即可访问到同一内容
curl 10.110.34.194/volume/volume.html
1
2
3
4
5
6
7
8
9
10
11
12
13
14
15
16
17
18
19
20
21
22
23
24
25
26
27
28
29
30
31
32
33
34
35
36
37
38
39
40
41
42
43
44
45
46
47
48
49
50
51
52
53
54
55
56
apiVersion: apps/v1 kind: Deployment metadata: name: nginx-v3 labels: deployment: nginx-v3 spec: replicas: 2 selector: matchLabels: app: nginxv3 template: metadata: name: nginxv3 labels: app: nginxv3 spec: restartPolicy: Always containers: - name: nginx-01 image: hub.nnv5.cn/test/myapp:v3 imagePullPolicy: IfNotPresent ports: - name: http containerPort: 80 protocol: TCP workingDir: /opt volumeMounts: - name: empty-data1 mountPath: /usr/share/nginx/html/volume/ - name: busybox image: busybox imagePullPolicy: IfNotPresent workingDir: /opt command: ['/bin/sh' ,'-c' ,'for i in `seq 9999`;do echo "$HOSTNAME $(date)" >> /opt/volume.html; sleep 2; done' ] volumeMounts: - name: empty-data1 mountPath: /opt/ volumes: - name: empty-data1 emptyDir: {} --- apiVersion: v1 kind: Service metadata: name: nginxv3-svc labels: svc: nginxv3-svc spec: selector: app: nginxv3 ports: - name: web-80 port: 80 targetPort: 80 protocol: TCP
7.1.4 hostPath存储卷 hostPath 卷将主机节点的文件系统中的文件或目录挂载到集群中
hostPath 的用途如下:
运行需要访问 Docker 内部的容器;使用 /var/lib/docker 的 hostPath
在容器中运行 cAdvisor;使用 /dev/cgroups 的 hostPath
允许 pod 指定给定的 hostPath 是否应该在 pod 运行之前存在,是否应该创建,以及它应该以什么形式存在
除了所需的 path 属性之外,用户还可以为 hostPath 卷指定 type
支持的 type 值如下:
取值
行为
空字符串(默认)用于向后兼容,这意味着在安装 hostPath 卷之前不会执行任何检查。
DirectoryOrCreate如果在给定路径上什么都不存在,那么将根据需要创建空目录,权限设置为 0755,具有与 Kubelet 相同的组和所有权。
Directory在给定路径上必须存在的目录。
FileOrCreate如果在给定路径上什么都不存在,那么将在那里根据需要创建空文件,权限设置为 0644,具有与 Kubelet 相同的组和所有权。
File在给定路径上必须存在的文件。
Socket在给定路径上必须存在的 UNIX 套接字。
CharDevice在给定路径上必须存在的字符设备。
BlockDevice在给定路径上必须存在的块设备。
当使用这种类型的卷时要小心,因为:
具有相同配置(例如从 podTemplate 创建)的多个 Pod 会由于节点上文件的不同而在不同节点上有不同的行为。
当 Kubernetes 按照计划添加资源感知的调度时,这类调度机制将无法考虑由 hostPath 使用的资源。
基础主机上创建的文件或目录只能由 root 用户写入。您需要在 特权容器 中以 root 身份运行进程,或者修改主机上的文件权限以便容器能够写入 hostPath 卷。
hostPath示例
创建一个名为hostpath的主机存储卷主机存储目录为/data,pod中nginxv3这个容器挂载名为hostpath的主机存储卷到容器的/usr/share/nginx/html目录下(网站根目录),启动pod后在宿主机/data目录下创建一个index.html文件,通过访问svc的ClusterIP即可查看到/data/index.html的资源。
1
2
3
4
5
6
7
8
9
10
11
12
13
14
15
16
17
18
19
20
21
22
23
24
25
26
27
28
29
30
31
32
33
34
35
36
37
38
39
40
41
42
43
44
45
46
47
48
49
50
apiVersion: apps/v1 kind: Deployment metadata: name: nginx-v3 labels: deployment: nginx-v3 spec: replicas: 2 selector: matchLabels: app: nginxv3 template: metadata: name: nginxv3 labels: app: nginxv3 spec: restartPolicy: Always containers: - name: nginx-01 image: hub.nnv5.cn/test/myapp:v3 imagePullPolicy: IfNotPresent ports: - name: http containerPort: 80 protocol: TCP workingDir: /opt volumeMounts: - name: hostpath mountPath: /usr/share/nginx/html volumes: - name: hostpath hostPath: path: /data/ type: DirectoryOrCreate --- apiVersion: v1 kind: Service metadata: name: nginxv3-svc labels: svc: nginxv3-svc spec: selector: app: nginxv3 ports: - name: web-80 port: 80 targetPort: 80 protocol: TCP
7.1.4 NFS存储卷 nfs 卷能将 NFS (网络文件系统) 挂载到 Pod 中。 不像 emptyDir 那样会在删除 Pod 的同时也会被删除挂载目录的数据,nfs 卷的内容在删除 Pod 时会被保存,卷只是被卸载掉了。 这意味着 nfs 卷可以被预先填充数据,并且这些数据可以在 Pod 之间”共享”。
NFS存储卷示例:
1 2 3 4 5 6 7 8 9 10 11 12 13 14 15 16 17 18 19 20 21 22 23 24 25 26 27 28 29 30 31 32 33 34 35 36 37 38 39 40 41 42 43 44 45 46 47 48 49 50 51 52 53 54 55 56 57 58 59 60 61 62 63 64 65 66 67 68 69 70 71 72 73 74 75 76 77 78 79 80 81 82 83 84 85 86 87 88 89 90 91 92 93 94 95 96 97 [root@hdp01 ~]$ yum install -y nfs-utils nfs [root@hdp01 ~]$ mkdir /data/volumes [root@hdp01 ~]$ vim /etc/exports /data/volumes 192.168.1.0/24(rw,no_root_squash) [root@hdp01 ~]$ systemctl restart nfs [root@k8s-node01 data]$ yum install -y nfs-utils [root@k8s-node02 data]$ yum install -y nfs-utils [root@k8s-node01 data]$ mount -t nfs 192.168.1.21:/data/volumes /opt/ [root@k8s-node01 data]$ df -hT | grep nfs 192.168.1.21:/data/volumes nfs4 500G 9.7G 491G 2% /opt [root@k8s-master volume]$ vim nginx-ingress-volume-nfs.yaml --------------------------------------------------------------- apiVersion: apps/v1 kind: Deployment metadata: name: nginx-v3 labels: deployment: nginx-v3 spec: replicas: 2 selector: matchLabels: app: nginxv3 template: metadata: name: nginxv3 labels: app: nginxv3 spec: restartPolicy: Always containers: - name: nginx-01 image: hub.nnv5.cn/test/myapp:v3 imagePullPolicy: IfNotPresent ports: - name: http containerPort: 80 protocol: TCP workingDir: /opt volumeMounts: - name: nfs-mount mountPath: /usr/share/nginx/html/nfs/ volumes: - name: nfs-mount nfs: path: /data/volumes server: 192.168.1.21 --- apiVersion: v1 kind: Service metadata: name: nginxv3-svc labels: svc: nginxv3-svc spec: selector: app: nginxv3 ports: - name: web-80 port: 80 targetPort: 80 protocol: TCP [root@k8s-master volume]$ kubectl apply -f nginx-ingress-volume-nfs.yaml [root@k8s-master volume]$ kubectl get pods -o wide NAME READY STATUS RESTARTS AGE IP NODE NOMINATED NODE READINESS GATES nginx-v3-85bb67bfb-6mw2n 1/1 Running 0 2m17s 10.244.1.27 k8s-node01.nnv5.cn <none> <none> nginx-v3-85bb67bfb-qfwjv 1/1 Running 0 2m17s 10.244.2.19 k8s-node02.nnv5.cn <none> <none> [root@k8s-master volume]$ kubectl get svc NAME TYPE CLUSTER-IP EXTERNAL-IP PORT(S) AGE kubernetes ClusterIP 10.96.0.1 <none> 443/TCP 47h nginxv3-svc ClusterIP 10.105.159.234 <none> 80/TCP 3m16s [root@k8s-master volume]$ curl 10.105.159.234/hostname.html nginx-v3-85bb67bfb-qfwjv [root@k8s-master volume]$ curl 10.105.159.234/hostname.html nginx-v3-85bb67bfb-6mw2n [root@hdp01 volumes]$ echo 'nfs-test' > index.html [root@k8s-master volume]$ curl 10.105.159.234/nfs/ nfs-test [root@k8s-master volume]$ curl 10.105.159.234/nfs/ nfs-test
7.1.5 PV、PVC存储卷 概念 PersistentVolume(PV)
是由管理员设置的存储,它是群集的一部分。就像节点是集群中的资源一样,PV 也是集群中的资源。 PV 是
PersistentVolumeClaim(PVC)
是用户存储的请求。它与 Pod 相似。Pod 消耗节点资源,PVC 消耗 PV 资源。Pod 可以请求特定级别的资源
pv与pvc生存周期 1 Provisioning(配置)---> Binding(绑定)--->Using(使用)---> Releasing(释放) ---> Recycling(回收)
Provisioning
1
2
3
4
5
6
7
这里有两种PV的提供方式:静态或者动态 静态-->直接固定存储空间: 集群管理员创建一些 PV。它们携带可供集群用户使用的真实存储的详细信息。 它们存在于Kubernetes API中,可用于消费。 动态-->通过存储类进行动态创建存储空间: 当管理员创建的静态 PV 都不匹配用户的 PVC 时,集群可能会尝试动态地为 PVC 配置卷。此配置基于 StorageClasses:PVC 必须请求存储类,并且管理员必须已创建并配置该类才能进行动态配置。 要求该类的声明有效地为自己禁用动态配置。
Binding
在动态配置的情况下,用户创建或已经创建了具有特定数量的存储请求和特定访问模式的PersistentVolumeClaim。 主机中的控制回路监视新的PVC,找到匹配的PV(如果可能),并将 PVC 和 PV 绑定在一起。 如果为新的PVC动态配置PV,则循环将始终将该PV绑定到PVC。 否则,用户总是至少得到他们要求的内容,但是卷可能超出了要求。 一旦绑定,PersistentVolumeClaim绑定是排他的,不管用于绑定它们的模式。
如果匹配的卷不存在,PVC将保持无限期。 随着匹配卷变得可用,PVC将被绑定。 例如,提供许多50Gi PV的集群将不匹配要求100Gi的PVC。 当集群中添加100Gi PV时,可以绑定PVC。
Using
Pod使用PVC作为卷。 集群检查声明以找到绑定的卷并挂载该卷的卷。 对于支持多种访问模式的卷,用户在将其声明用作pod中的卷时指定所需的模式。
一旦用户有声明并且该声明被绑定,绑定的PV属于用户,只要他们需要它。 用户通过在其Pod的卷块中包含PersistentVolumeClaim来安排Pods并访问其声明的PV。
Releasing
PersistentVolume的回收策略告诉集群在释放其声明后,该卷应该如何处理。 目前,卷可以是保留,回收或删除。 保留可以手动回收资源。 对于那些支持它的卷插件,删除将从Kubernetes中删除PersistentVolume对象,以及删除外部基础架构(如AWS EBS,GCE PD,Azure Disk或Cinder卷)中关联的存储资产。 动态配置的卷始终被删除
Recycling
如果受适当的卷插件支持,回收将对卷执行基本的擦除(rm -rf / thevolume / *),并使其再次可用于新的声明。
持久化卷声明的保护 PVC 保护的目的是确保由 pod 正在使用的 PVC 不会从系统中移除,因为如果被移除的话可能会导致数据丢失
当启用PVC 保护 alpha 功能时,如果用户删除了一个 pod 正在使用的 PVC,则该 PVC 不会被立即删除。PVC 的
PV持久化卷类型 PersistentVolume 类型以插件形式实现。Kubernetes 目前支持以下插件类型:
GCEPersistentDisk AWSElasticBlockStore AzureFile AzureDisk FC (Fibre Channel)
FlexVolume Flocker NFS iSCSI RBD (Ceph Block Device) CephFS
Cinder (OpenStack block storage) Glusterfs VsphereVolume Quobyte Volumes
HostPath VMware Photon Portworx Volumes ScaleIO Volumes StorageOS
1
2
3
4
5
6
7
8
9
10
11
12
13
14
15
16
17
18
apiVersion: v1 kind: PersistentVolume metadata: name: pv0003 spec: capacity: storage: 5Gi volumeMode: Filesystem accessModes: - ReadWriteOnce persistentVolumeReclaimPolicy: Recycle storageClassName: slow mountOptions: - hard - nfsvers=4.1 nfs: path: /tmp server: 172.17 .0 .2
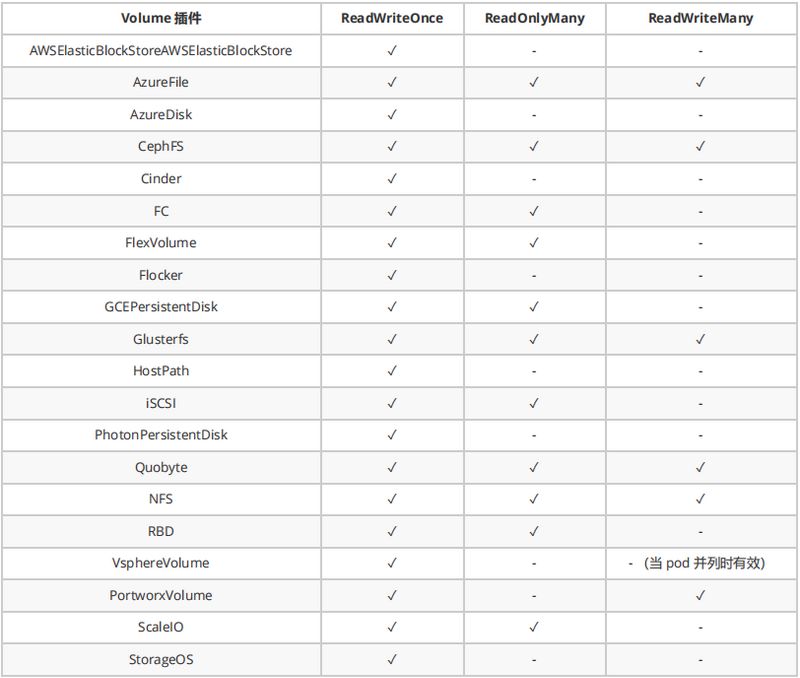
PV存储模式 PersistentVolume 可以以资源提供者支持的任何方式挂载到主机上。如下表所示,供应商具有不同的功能,每个
ReadWriteOnce——该卷可以被单个节点以读/写模式挂载
ReadOnlyMany——该卷可以被多个节点以只读模式挂载
ReadWriteMany——该卷可以被多个节点以读/写模式挂载
在命令行中,访问模式缩写为:
RWO - ReadWriteOnce
ROX - ReadOnlyMany
RWX - ReadWriteMany
PV回收策略
Retain(保留)——手动回收
Recycle(回收)——基本擦除(rm -rf /thevolume/*)
Delete(删除)——关联的存储资产(例如 AWS EBS、GCE PD、Azure Disk 和 OpenStack Cinder 卷)
当前,只有 NFS 和 HostPath 支持回收策略。AWS EBS、GCE PD、Azure Disk 和 Cinder 卷支持删除策略
PV状态 卷可以处于以下的某种状态:
Available(可用)——一块空闲资源还没有被任何声明绑定
Bound(已绑定)——卷已经被声明绑定
Released(已释放)——声明被删除,但是资源还未被集群重新声明
Failed(失败)——该卷的自动回收失败
命令行会显示绑定到 PV 的 PVC 的名称
定义使用PVC 1 2 3 4 5 6 7 8 9 10 11 12 13 14 15 16 17 18 19 20 21 22 23 24 25 26 27 28 29 30 31 32 33 34 35 apiVersion: v1 kind: PersistentVolumeClaim metadata: name: myclaim spec: accessModes: - ReadWriteOnce volumeMode: Filesystem resources: requests: storage: 8Gi storageClassName: slow selector: matchLabels: release: "stable" matchExpressions: - {key: environment , operator: In , values: [dev ]} apiVersion: v1 kind: Pod metadata: name: mypod spec: containers: - name: myfrontend image: nginx volumeMounts: - mountPath: "/var/www/html" name: mypd volumes: - name: mypd persistentVolumeClaim: claimName: myclaim
PV、PVC使用NFS存储案例 1.NFS服务器上面创建共享资源目录并配置目录共享
1 2 3 4 5 6 7 8 [root@hdp01 volumes] [root@hdp01 volumes] /data/volumes/v1 192.168.1.0/24(rw,no_root_squash) /data/volumes/v2 192.168.1.0/24(rw,no_root_squash) /data/volumes/v3 192.168.1.0/24(rw,no_root_squash) /data/volumes/v4 192.168.1.0/24(rw,no_root_squash) /data/volumes/v5 192.168.1.0/24(rw,no_root_squash) [root@hdp01 volumes]
2.在k8s集群中定义PV存储与NFS绑定
1 2 3 4 5 6 7 8 9 10 11 12 13 14 15 16 17 18 19 20 21 22 23 24 25 26 27 28 29 30 31 32 33 34 35 36 37 38 39 40 41 42 43 44 45 46 47 48 49 50 51 52 53 54 55 56 57 58 59 60 61 62 63 64 65 66 67 68 69 70 [root@k8s-master volume] apiVersion: v1 kind: PersistentVolume metadata: name: pv01 spec: nfs: path: /data/volumes/v1 server: 192.168.1.21 accessModes: ["ReadWriteMany" ,"ReadWriteOnce" ] capacity: storage: 1Gi --- apiVersion: v1 kind: PersistentVolume metadata: name: pv02 spec: nfs: path: /data/volumes/v2 server: 192.168.1.21 accessModes: ["ReadWriteMany" ,"ReadWriteOnce" ] capacity: storage: 2Gi --- apiVersion: v1 kind: PersistentVolume metadata: name: pv03 spec: nfs: path: /data/volumes/v3 server: 192.168.1.21 accessModes: ["ReadWriteMany" ,"ReadWriteOnce" ] capacity: storage: 3Gi --- apiVersion: v1 kind: PersistentVolume metadata: name: pv04 spec: nfs: path: /data/volumes/v4 server: 192.168.1.21 accessModes: ["ReadWriteMany" ,"ReadWriteOnce" ] capacity: storage: 4Gi --- apiVersion: v1 kind: PersistentVolume metadata: name: pv05 spec: nfs: path: /data/volumes/v5 server: 192.168.1.21 accessModes: ["ReadWriteMany" ,"ReadWriteOnce" ] capacity: storage: 5Gi [root@k8s-master volume] [root@k8s-master volume] NAME CAPACITY ACCESS MODES RECLAIM POLICY STATUS CLAIM STORAGECLASS REASON AGE pv01 1Gi RWO,RWX Retain Available 27h pv02 2Gi RWO,RWX Retain Available 27h pv03 3Gi RWO,RWX Retain Available 27h pv04 4Gi RWO,RWX Retain Available 27h pv05 5Gi RWO,RWX Retain Available 27h
3.创建pvc以及deploy和service
1 2 3 4 5 6 7 8 9 10 11 12 13 14 15 16 17 18 19 20 21 22 23 24 25 26 27 28 29 30 31 32 33 34 35 36 37 38 39 40 41 42 43 44 45 46 47 48 49 50 51 52 53 54 55 56 57 58 59 60 61 62 63 64 65 66 67 68 69 70 71 [root@k8s-master volume ] apiVersion: v1 kind: PersistentVolumeClaim metadata: name: pvc-daemon spec: accessModes: ["ReadWriteMany" ] resources: requests: storage: 4Gi --- apiVersion: apps/v1 kind: Deployment metadata: name: nginx-v3 labels: deployment: nginx-v3 spec: replicas: 2 selector: matchLabels: app: nginxv3 template: metadata: name: nginxv3 namespace: default labels: app: nginxv3 spec: restartPolicy: Always containers: - name: nginx-01 image: hub.nnv5.cn/test/myapp:v3 imagePullPolicy: IfNotPresent ports: - name: http containerPort: 80 protocol: TCP workingDir: /opt volumeMounts: - name: pvc-daemon-mount mountPath: /usr/share/nginx/html/nfs/ - name: busybox image: busybox imagePullPolicy: IfNotPresent workingDir: /opt command: ['/bin/sh' ,'-c' ,'for i in `seq 9999`;do echo "$HOSTNAME $(date)" > /usr/share/nginx/html/nfs/index.html; sleep 1; done' ] volumeMounts: - name: pvc-daemon-mount mountPath: /usr/share/nginx/html/nfs/ volumes: - name: pvc-daemon-mount persistentVolumeClaim: claimName: pvc-daemon --- apiVersion: v1 kind: Service metadata: name: nginxv3-svc labels: svc: nginxv3-svc spec: selector: app: nginxv3 ports: - name: web-80 port: 80 targetPort: 80 protocol: TCP [root@k8s-master volume ]
4.访问验证
1 2 3 4 5 6 7 8 9 10 11 12 13 14 15 16 17 18 19 20 21 22 23 24 25 26 27 28 29 30 31 32 33 34 35 36 37 38 39 40 41 42 43 44 45 46 47 48 49 [root@k8s-master volume] NAME CAPACITY ACCESS MODES RECLAIM POLICY STATUS CLAIM STORAGECLASS REASON AGE pv01 1Gi RWO,RWX Retain Available 27h pv02 2Gi RWO,RWX Retain Available 27h pv03 3Gi RWO,RWX Retain Available 27h pv04 4Gi RWO,RWX Retain Available 27h pv05 5Gi RWO,RWX Retain Bound default/pvc-daemon 27h [root@k8s-master volume] NAME STATUS VOLUME CAPACITY ACCESS MODES STORAGECLASS AGE pvc-daemon Bound pv05 5Gi RWO,RWX 27h [root@k8s-master volume] NAME READY STATUS RESTARTS AGE IP NODE NOMINATED NODE READINESS GATES nginx-v3-67c4d9f67c-ldrnt 2/2 Running 9 27h 10.244.2.21 k8s-node02.nnv5.cn <none> <none> nginx-v3-67c4d9f67c-thcmh 2/2 Running 9 27h 10.244.1.29 k8s-node01.nnv5.cn <none> <none> [root@k8s-master volume] [root@k8s-master volume] NAME TYPE CLUSTER-IP EXTERNAL-IP PORT(S) AGE kubernetes ClusterIP 10.96.0.1 <none> 443/TCP 3d21h nginxv3-svc ClusterIP 10.103.146.174 <none> 80/TCP 27h 1. 访问nginxv3-svc的ClusterIP即可访问到不同pod内容 [root@k8s-master volume] nginx-v3-67c4d9f67c-ldrnt [root@k8s-master volume] nginx-v3-67c4d9f67c-thcmh 2. 两个pod将pvc-daemon这个pvc挂载到了pod的网站根目录下的nfd/目录下,由于busybox容器会每间隔两秒在nfs/目录下生成一个index.html文件(内容为pod的名称和时间),因此在pvc-daemon关联的pv05这个nfs服务器源目录下会查看到index.html文件,随时查看内容和时间都不同(因为不同pod一直在生成)。 [root@k8s-master volume] nginx-v3-67c4d9f67c-ldrnt Fri Jul 3 05:36:06 UTC 2020 [root@k8s-master volume] nginx-v3-67c4d9f67c-thcmh Fri Jul 3 05:36:08 UTC 2020 [root@hdp01 v5] /data/volumes/v5 [root@hdp01 v5] nginx-v3-67c4d9f67c-ldrnt Fri Jul 3 05:28:55 UTC 2020 [root@hdp01 v5] nginx-v3-67c4d9f67c-thcmh Fri Jul 3 05:28:56 UTC 2020
7.2 ConfigMap
configmap是让配置文件从镜像中解耦,让镜像的可移植性和可复制性。许多应用程序会从配置文件、命令行参数或环境变量中读取配置信息。这些配置信息需要与docker image解耦,你总不能每修改一个配置就重做一个image吧?ConfigMap API给我们提供了向容器中注入配置信息的机制,ConfigMap可以被用来保存单个属性,也可以用来保存整个配置文件或者JSON二进制大对象
ConfigMap API资源用来保存key-value pair配置数据,这个数据可以在pods里使用,或者被用来为像controller一样的系统组件存储配置数据。虽然ConfigMap跟Secrets类似,但是ConfigMap更方便的处理不含敏感信息的字符串。 注意:ConfigMaps不是属性配置文件的替代品。ConfigMaps只是作为多个properties文件的引用。可以把它理解为Linux系统中的/etc目录,专门用来存储配置文件的目录。下面举个例子,使用ConfigMap配置来创建Kuberntes Volumes,ConfigMap中的每个data项都会成为一个新文件。
创建ConfigMap方式 1。通过命令行单一键值对方式创建configmap
1 2 3 4 5 6 7 8 9 10 11 12 13 14 15 16 17 18 19 20 21 [root@k8s-master ~]$ kubectl create configmap my-config --from-literal=name=zhangsan --from-literal=sex=nan configmap/my-config created [root@k8s-master ~]$ kubectl get configmap NAME DATA AGE my-config 2 9s [root@k8s-master ~]$ kubectl describe configmap my-config Name: my-config Namespace: default Labels: <none> Annotations: <none> Data ==== name: ---- zhangsan sex: ---- nan Events: <none>
2。通过命令行方式将整个文件内容创建为一个configmap
1 2 3 4 5 6 7 8 9 10 11 12 13 14 15 16 17 18 19 20 21 22 23 24 25 26 27 28 29 30 31 32 33 34 35 36 37 38 39 40 41 42 43 44 45 46 47 48 49 50 51 52 53 54 55 56 [root@k8s-master configmap]$ vim www-nginx.conf --------------------------------------------------------------- server { listen 80; server_name www.nnv5.cn; location / { root /data; index index.php; } location ~ .php$ { fastcgi_split_path_info ^(.+?\.php)(/.*)$; try_files $uri =404; root /data; fastcgi_pass 127.0.0.1:9000; fastcgi_index index.php; fastcgi_param SCRIPT_FILENAME $document_root$fastcgi_script_name ; include fastcgi.conf; } } [root@k8s-master configmap]$ kubectl create configmap nginx-www-vhost --from-file=./www-nginx.conf configmap/nginx-www-vhost created [root@k8s-master configmap]$ kubectl get configmap NAME DATA AGE my-config 2 6m29s nginx-www-vhost 1 7s [root@k8s-master configmap]$ kubectl describe configmap nginx-www-vhost Name: nginx-www-vhost Namespace: default Labels: <none> Annotations: <none> Data ==== www-nginx.conf: ---- server { listen 80; server_name www.nnv5.cn; location / { root /data; index index.php; } location ~ .php$ { fastcgi_split_path_info ^(.+?\.php)(/.*)$; try_files $uri =404; root /data; fastcgi_pass 127.0.0.1:9000; fastcgi_index index.php; fastcgi_param SCRIPT_FILENAME $document_root$fastcgi_script_name ; include fastcgi.conf; } }
如何使用configmap 1。通过环境变量方式将configmap键值注入到容器
1 2 3 4 5 6 7 8 9 10 11 12 13 14 15 16 17 18 19 20 21 22 23 24 25 26 27 28 29 30 31 32 33 34 35 36 37 38 39 40 41 42 43 44 45 46 47 48 49 50 51 52 53 54 55 56 57 58 59 60 61 62 63 [root@k8s-master pvc]$ kubectl create configmap nginxconfig --from-literal=NGINX_SERVER_NAME=www.nnv5.cn --from-literal=NGINX_PORT=8080 configmap/nginxconfig created [root@k8s-master pvc]$ kubectl get cm NAME DATA AGE nginxconfig 2 4s [root@k8s-master pvc]$ vim configmap.yaml --------------------------------------------------- apiVersion: apps/v1 kind: Deployment metadata: name: configmap-deploy spec: replicas: 3 selector: matchLabels: name: configmap template: metadata: name: configmap labels: name: configmap spec: restartPolicy: Always containers: - name: configmap image: busybox:latest imagePullPolicy: IfNotPresent command : ['/bin/sh' ,'-c' ,'sleep 99999' ] env : - name: NGINX_SERVER_NAME valueFrom: configMapKeyRef: name: nginxconfig key: NGINX_SERVER_NAME - name: NGINX_SERVER_PORT valueFrom: configMapKeyRef: name: nginxconfig key: NGINX_PORT [root@k8s-master pvc]$ kubectl apply -f configmap.yaml deployment.apps/configmap-deploy created [root@k8s-master pvc]$ kubectl get pods NAME READY STATUS RESTARTS AGE configmap-deploy-54db8b994-m8n6w 1/1 Running 0 8s configmap-deploy-54db8b994-nkpm7 1/1 Running 0 8s configmap-deploy-54db8b994-wgqh8 1/1 Running 0 8s [root@k8s-master pvc]$ kubectl exec -it configmap-deploy-54db8b994-m8n6w -c configmap sh / www.nnv5.cn 8080 [root@k8s-master pvc]$ kubectl edit cm nginxconfig configmap/nginxconfig edited [root@k8s-master pvc]$ kubectl exec -it configmap-deploy-54db8b994-m8n6w -c configmap sh / 8080
2。通过存储卷挂载的方式使用configmap(可以实时更新)
1 2 3 4 5 6 7 8 9 10 11 12 13 14 15 16 17 18 19 20 21 22 23 24 25 26 27 28 29 30 31 32 33 34 35 36 37 38 39 40 41 42 43 44 45 46 47 48 49 50 51 52 53 54 55 56 57 58 59 60 61 62 63 64 65 66 67 68 69 70 71 72 73 74 75 76 77 78 79 80 81 82 83 84 85 86 87 88 89 90 91 92 93 94 95 96 97 98 99 100 101 102 103 104 105 106 107 108 109 110 111 112 113 114 115 116 117 118 119 120 121 122 123 124 [root@k8s-master pvc]$ vim nginx-8080.conf server { listen 8080; root /usr/share/nginx/html/; index index.html; location / { root /usr/share/nginx/html/; index index.html; } } [root@k8s-master pvc]$ kubectl create configmap nginx-8080 --from-file=nginx-8080-config.conf=./nginx-8080.conf configmap/nginx-8080 created [root@k8s-master pvc]$ kubectl describe cm nginx-8080 Name: nginx-8080 Namespace: default Labels: <none> Annotations: <none> Data ==== nginx-8080-config.conf: ---- server { listen 8080; root /usr/share/nginx/html/; index index.html; location / { root /usr/share/nginx/html/; index index.html; } } Events: <none> [root@k8s-master pvc]$ vim configmap-volume.yaml apiVersion: apps/v1 kind: Deployment metadata: name: configmap-deploy spec: replicas: 3 selector: matchLabels: name: configmap template: metadata: name: configmap labels: name: configmap spec: restartPolicy: Always containers: - name: configmap image: hub.nnv5.cn/test/myapp:v2 imagePullPolicy: IfNotPresent volumeMounts: - name: nginx-8080-conf mountPath: /etc/nginx/conf.d/ volumes: - name: nginx-8080-conf configMap: name: nginx-8080 [root@k8s-master pvc]$ kubectl apply -f configmap-volume.yaml deployment.apps/configmap-deploy created [root@k8s-master pvc]$ kubectl get pods -o wide NAME READY STATUS RESTARTS AGE IP NODE NOMINATED NODE READINESS GATES configmap-deploy-5d45b467f4-cwb6g 1/1 Running 0 2m3s 10.244.2.43 k8s-node02.nnv5.cn <none> <none> configmap-deploy-5d45b467f4-kthls 1/1 Running 0 2m3s 10.244.1.43 k8s-node01.nnv5.cn <none> <none> configmap-deploy-5d45b467f4-mvrq4 1/1 Running 0 2m3s 10.244.2.42 k8s-node02.nnv5.cn <none> <none> [root@k8s-master pvc]$ curl 10.244.2.43:8080 Hello MyApp | Version: v2 | <a href="hostname.html" >Pod Name</a> [root@k8s-master pvc]$ kubectl exec -it configmap-deploy-5d45b467f4-cwb6g sh / server { listen 8080; root /usr/share/nginx/html/; index index.html; location / { root /usr/share/nginx/html/; index index.html; } } [root@k8s-master configmap]$ kubectl edit cm nginx-8080 data: nginx-8080-config.conf: "server {\n\tlisten 8999;\n\troot /usr/share/nginx/html/;\n\tindex index.html;\n\tlocation / {\n\t\troot /usr/share/nginx/html/;\n\t\tindex index.html;\n\t}\n}\n" kind: ConfigMap metadata: creationTimestamp: "2020-07-06T11:45:59Z" name: nginx-8080 namespace: default resourceVersion: "763850" selfLink: /api/v1/namespaces/default/configmaps/nginx-8080 uid: bfd1cbd0-a8dd-4d6d-89ca-1feda27ee126 [root@k8s-master pvc]$ kubectl exec -it configmap-deploy-5d45b467f4-cwb6g sh / $ cat /etc/nginx/conf.d/nginx-8080-config.conf server { listen 8999; root /usr/share/nginx/html/; index index.html; location / { root /usr/share/nginx/html/; index index.html; } } / nginx: the configuration file /etc/nginx/nginx.conf syntax is ok nginx: configuration file /etc/nginx/nginx.conf test is successful / [root@k8s-master configmap] Hello MyApp | Version: v2 | <a href="hostname.html" >Pod Name</a>
7.3 Secret
Secret对象存储数据的方式是以键值方式存储数据,在Pod资源进行调用Secret的方式是通过环境变量或者存储卷的方式进行访问数据,解决了密码、token、密钥等敏感数据的配置问题,而不需要把这些敏感数据暴露到镜像或者Pod Spec中。另外,Secret对象的数据存储和打印格式为Base64编码的字符串,因此用户在创建Secret对象时,也需要提供该类型的编码格式的数据。在容器中以环境变量或存储卷的方式访问时,会自动解码为明文格式。需要注意的是,如果是在Master节点上,Secret对象以非加密的格式存储在etcd中,所以需要对etcd的管理和权限进行严格控制。
Secret类型
Service Account :用来访问Kubernetes API,由Kubernetes自动创建,并且会自动挂载到Pod的/run/secrets/kubernetes.io/serviceaccount目录中;
Opaque :base64编码格式的Secret,用来存储密码、密钥、信息、证书等,类型标识符为generic;
kubernetes.io/dockerconfigjson :用来存储私有docker registry的认证信息,类型标识为docker-registry。
kubernetes.io/tls:用于为SSL通信模式存储证书和私钥文件,命令式创建类型标识为tls。
Secret创建的方式 1。通过命令方式创建 1 2 3 4 5 6 7 8 9 10 11 12 13 14 15 16 17 18 19 20 21 22 23 24 25 26 27 28 29 30 31 32 33 34 35 36 37 38 39 40 41 42 43 44 45 46 47 48 49 50 51 52 53 54 55 56 57 58 [root@k8s-master secret]$ kubectl create secret generic db-user-pass --from-file=./username.txt --from-file=./password.txt [root@k8s-master secret]$ echo 'zhangsan' > username.txt && echo 'passwd@123' > passwd.txt [root@k8s-master secret]$ kubectl create secret generic db-user-passwd --from-file=./username.txt --from-file=./passwd.txt secret/db-user-passwd created [root@k8s-master secret]$ kubectl get secrets NAME TYPE DATA AGE db-user-passwd Opaque 2 7s [root@k8s-master secret]$ kubectl describe secrets db-user-passwd Name: db-user-passwd Namespace: default Labels: <none> Annotations: <none> Type: Opaque Data ==== passwd.txt: 11 bytes username.txt: 9 bytes [root@k8s-master secret]$ kubectl create secret generic mysecret --from-literal=username='admin' --from-literal=passwd='pwd@123' secret/mysecret created [root@k8s-master secret]$ kubectl describe secrets mysecret Name: mysecret Namespace: default Labels: <none> Annotations: <none> Type: Opaque Data ==== username: 5 bytes passwd: 7 bytes [root@k8s-master secret]$ cat >> info.txt <<EOF username=zhangsan passwd=passwd@123 EOF [root@k8s-master secret]$ kubectl create secret generic env-secret --from-env-file=./info.txt secret/env-secret created [root@k8s-master secret]$ kubectl describe secrets env-secret Name: env-secret Namespace: default Labels: <none> Annotations: <none> Type: Opaque Data ==== passwd: 10 bytes username: 8 bytes
2。资源清单方式创建 1 2 3 4 5 6 7 8 9 10 11 12 13 14 15 16 17 18 19 20 21 22 23 24 25 26 27 28 29 30 31 32 33 34 35 36 37 38 39 40 41 [root@k8s-master secret ] YWRtaW4K [root@k8s-master secret ] cGFzc3dkQDEyMwo= [root@k8s-master secret ]$ vim yaml-secret.yaml apiVersion: v1 kind: Secret metadata: name: yaml-secret data: username: YWRtaW4K passwd: cGFzc3dkQDEyMwo= [root@k8s-master secret ]$ kubectl apply -f yaml-secret.yaml secret/yaml-secret created [root@k8s-master secret ] Name: yaml-secret Namespace: default Labels: <none> Annotations: Type: Opaque Data ==== passwd: 11 bytes username: 6 bytes [root@k8s-master secret ] ...... apiVersion: v1 data: passwd: cGFzc3dkQDEyMwo= username: YWRtaW4K ...... [root@k8s-master secret ]$ echo cGFzc3dkQDEyMwo= | base64 --decode passwd@123 [root@k8s-master secret ]$ echo YWRtaW4K | base64 --decode admin
如何使用Secret 1。通过环境变量env的方式注入secret
注意:env方式注入的secret当针对secret内容修改后,pod内的env变量不会立即发生改变,volume的注入方式会立即发生改变。
1 2 3 4 5 6 7 8 9 10 11 12 13 14 15 16 17 18 19 20 21 22 23 24 25 26 27 28 29 30 31 32 33 34 35 36 37 38 39 40 41 42 43 44 45 46 47 48 49 50 51 52 53 54 55 56 57 58 59 60 61 62 63 64 65 [root@k8s-master secret]$ kubectl create secret generic mysecret --from-literal=username='admin' --from-literal=passwd='pwd@123' secret/mysecret created [root@k8s-master secret]$ kubectl describe secrets mysecret Name: mysecret Namespace: default Labels: <none> Annotations: <none> Type: Opaque Data ==== username: 5 bytes passwd: 7 bytes [root@k8s-master secret]$ vim secret-env.yaml apiVersion: apps/v1 kind: Deployment metadata: name: secret-env-deploy spec: replicas: 3 selector: matchLabels: name: secret-env template: metadata: name: secret-env labels: name: secret-env spec: restartPolicy: Always containers: - name: test01 image: busybox:latest imagePullPolicy: IfNotPresent command : ['/bin/sh' ,'-c' ,'sleep 99999' ] env : - name: MYSQL_USER_NAME valueFrom: secretKeyRef: name: mysecret key: username - name: MYSQL_PASS_WORD valueFrom: secretKeyRef: name: mysecret key: passwd [root@k8s-master secret]$ kubectl apply -f secret-env.yaml deployment.apps/secret-env-deploy created [root@k8s-master secret]$ kubectl get pods NAME READY STATUS RESTARTS AGE secret-env-deploy-6ddf6c4b4d-5jkqc 1/1 Running 0 6m49s secret-env-deploy-6ddf6c4b4d-98s9f 1/1 Running 0 6m49s secret-env-deploy-6ddf6c4b4d-nwk42 1/1 Running 0 6m49s [root@k8s-master secret]$ kubectl exec -it secret-env-deploy-6ddf6c4b4d-5jkqc -- printenv | grep MYSQL MYSQL_PASS_WORD=pwd @123 MYSQL_USER_NAME=admin
2。通过volume挂载的方式注入secret 1 2 3 4 5 6 7 8 9 10 11 12 13 14 15 16 17 18 19 20 21 22 23 24 25 26 27 28 29 30 31 32 33 34 35 36 37 38 39 40 41 42 43 44 45 46 47 48 49 50 51 52 53 54 55 56 57 58 59 60 61 62 63 64 65 66 67 68 69 70 71 72 73 74 75 76 77 78 79 80 81 [root@k8s-master secret]$ kubectl create secret generic mysecret --from-literal=username='admin' --from-literal=passwd='pwd@123' secret/mysecret created [root@k8s-master secret]$ kubectl describe secrets mysecret Name: mysecret Namespace: default Labels: <none> Annotations: <none> Type: Opaque Data ==== username: 5 bytes passwd: 7 bytes [root@k8s-master secret]$ vim secret-volume.yaml [root@k8s-master secret]$ cat secret-volume.yaml apiVersion: apps/v1 kind: Deployment metadata: name: secret-volume-deploy spec: replicas: 3 selector: matchLabels: name: secret-volume template: metadata: name: secret-volume labels: name: secret-volume spec: restartPolicy: Always containers: - name: test01 image: busybox:latest imagePullPolicy: IfNotPresent command : ['/bin/sh' ,'-c' ,'sleep 99999' ] volumeMounts: - name: volume-secret mountPath: /mnt/ volumes: - name: volume-secret secret: secretName: mysecret [root@k8s-master secret]$ kubectl apply -f secret-volume.yaml deployment.apps/secret-volume-deploy created [root@k8s-master secret]$ kubectl get pods NAME READY STATUS RESTARTS AGE secret-volume-deploy-65b586b895-htdwk 1/1 Running 0 2m8s secret-volume-deploy-65b586b895-mhpbm 1/1 Running 0 2m8s secret-volume-deploy-65b586b895-vdrcm 1/1 Running 0 2m8s [root@k8s-master secret]$ kubectl exec -it secret-volume-deploy-65b586b895-mhpbm -- sh / $ ls -l /mnt total 0 lrwxrwxrwx 1 root root 13 Jul 7 02:23 passwd -> ..data/passwd lrwxrwxrwx 1 root root 15 Jul 7 02:23 username -> ..data/username / $ cat /mnt/passwd pwd @123/ $ cat /mnt/username admin [root@k8s-master secret] bGlzaQo= [root@k8s-master secret] apiVersion: v1 data: passwd: cHdkQDEyMw== username: bGlzaQo= /proc lisi
注意:挂载的方式默认会将指定secret中的所有key挂载到指定目录下,上面示例中,如果只需要挂载mysecret中的username这个key,那么只需要使用iteam就可以实现,看下面的资源清单。
1 2 3 4 5 6 7 8 9 10 11 12 13 14 15 16 17 18 19 20 21 22 23 24 25 26 27 28 29 30 31 32 [root@k8s-master secret ]$ cat secret-volume-iteam.yaml apiVersion: apps/v1 kind: Deployment metadata: name: secret-volume-deploy spec: replicas: 3 selector: matchLabels: name: secret-volume template: metadata: name: secret-volume labels: name: secret-volume spec: restartPolicy: Always containers: - name: test01 image: busybox:latest imagePullPolicy: IfNotPresent command: ['/bin/sh' ,'-c' ,'sleep 99999' ] volumeMounts: - name: volume-secret mountPath: /mnt/ volumes: - name: volume-secret secret: secretName: mysecret items: - key: username path: username